Guide For Kubernetes
1. Most useful Commands
- Command 1: show logs of pod
The command:
kubectl logs POD_NAME -n NAMESPACE -f
Description:
Show logs inside a pod.
- Command 2: port-forward
The command:
kubectl port-forward TYPE/NAME [options] [LOCAL_PORT:]REMOTE_PORT [...[LOCAL_PORT_N:]REMOTE_PORT_N]
Description:
You way of connecting to a pod from the host.
The kubectl port-forward command in Kubernetes allows you to forward one or more local ports to a port on a Pod (or other Kubernetes resource like a Service). This is useful for debugging or temporarily accessing services running inside your cluster without exposing them externally.
Use resource type/name such as deployment/my_deployment to select a pod. Resource type defaults to pod if omitted.
Common Use-Case:
Accessing a web app running in a pod:
kubectl port-forward svc/my-service 8080:80
You can now access the service at http://localhost:8080.
Notes:
- This is a temporary and local-only tunnel; it's not for production use.
- It requires
kubectlto stay running in your terminal. - You must have access to the pod via your Kubernetes context.
- Command 3: kubectl exec
The command:
kubectl exec -it -n NAMESPACE POD_NAME -c CONTAINER_NAME -- sh
Description:
Use this command to:
- Execute a command inside a running pod.
- Execute a command inside a running container inside a running pod.
- If the
-nflag is omitted, namespace defaults todefault. - If the
-cflag is omitted, ssh is to the pod. - If the
-cflag is used, ssh is to the container inside the pod.
This command is very similar to the docker exec command.
Common Use-Case:
kubectl exec -it -n solve-dev solvebe-admin-server-3d45e6 -c solve-admin-server -- sh
- Command 4: manually delete a pod
The command:
kubectl delete pod POD_NAME
Description:
Deletes a pod by name.
A deleted pod, which was manually created, would be deleted forever.
A deleted pod, which was created by a deployment, would also be deleted, but a few seconds later, the deployment would create a new pod that would have a different hash and a IP address.
- Command 5: rollout status deploy
The command:
kubectl rollout status deploy DEPLOYMENT_NAME
Description:
The terminal is kept busy until the rollout is complete.
You get online updates about completed steps.
Most commonly used with:
kubectl scale deployment DEPLOYMENT_NAME --replicas=#number
Example Usage:
kubectl rollout status deploy ai-gateway-service -n dev-chatbot
- Command 6: manually scale a deployment
The command:
kubectl scale deployment DEPLOYMENT_NAME --replicas=#number
Example Usage:
kubectl rollout status deploy ai-gateway-service -n dev-chatbot
2. Kubectl Commands
- Command 0: Check/Upgrade Kubernetes version
The command:
kubectl version --client
Description:
Kubectl is a command line tool that you use to communicate with the Kubernetes API server. This above command determines whether you already have kubectl installed on your device.
- Command 1: show all contexts list
The command:
kubectl config get-contexts
Description:
Display one or many contexts from the kubeconfig file.
- Command 2: get current context
The command:
kubectl config current-context
Description:
Displays the current-context
- Command 3: switch to a context
The command:
kubectl config use-context context-name
Description:
Display one or many contexts from the kubeconfig file.
- Command 4: view config settings
The command:
kubectl config view
Description:
Displays a merged kubeconfig settings or a specified kubeconfig file.
A response example would look like:
When you haven't set any clusters yet:
apiVersion: v1
clusters: null
contexts: null
current-context: ""
kind: Config
preferences: {}
users: null
- Command 5: show cluster-info
The command:
kubectl cluster-info
Description:
Display endpoint information about the master and services in the cluster.
A response example would look like:
Kubernetes control plane is running at https://127.0.0.1:54341
CoreDNS is running at https://127.0.0.1:54341/api/v1/namespaces/kube-system/services/kube-dns:dns/proxy
To further debug and diagnose cluster problems, use 'kubectl cluster-info dump'.
- Command 6: get namespaces
The command:
kubectl get namespaces
Description:
Returns a list of current namespaces inside the cluster.
So what are namespaces for in kubernetes? In Kubernetes, namespaces provide a mechanism for isolating groups of resources within a single cluster. Names of resources need to be unique within a namespace, but not across namespaces. By default, a minikube cluster comes with 4 namespaces: default, kube-node-lease, kube-public, and kube-system.
A response example would look like:
NAME STATUS AGE
default Active 29m
kube-node-lease Active 29m
kube-public Active 29m
kube-system Active 29m
- Command 7: get deployments
The command:
kubectl get deployments {flags}
or in the singular form...
kubectl get deployment {flags}
or in the short form...
kubectl get deploy
Description:
Get deployments.
Commonly used options:
-
Flag 1: -n | --namespace
By default,kubectl get deploymentsreturns a list of all the deployments within thedefaultnamespace. To get deployments from another namespace, use the--namespaceflag, followed by the namespace's name.kubectl get deployments --namespace=kube-system
- Command 8: get pods
The command:
kubectl get pods <flags>
Description:
Get pods.
In the response of the kubectl get pods command, under the pods' names, you'll notice 3 things:
- The deployment's name
- The replicaSet's hash
- The pod's unique hash
Also, notice how to pods' IPs are internal IPs. Meaning, they cannot be accessed from the outside world (which is a good thing!).
Commonly used options:
-
Flag 1: -n | --namespace
By default,kubectl get podsreturns a list of all pod within thedefaultnamespace. To get pod living on another namespace, use the--namespaceflag, followed by the namespace's name.kubectl get pod --namespace=luckylove -
Flag 2: -o
To view a little more information, like the ip address for example, add the-o wideoption:kubectl get pods -o wide
- Command 9: get services
The command:
The plural form gets you many:
kubectl get services
# or...
kubectl get svc
The singular form gets a specific service: (by name)
kubectl get service <service-name>
Description:
Feels like this is an unnecessary command!
It doesn't give you more information than what kubectl get services gives back! It is more of a regex filterer to the kubectl get services command.
Displays information about Services / a specific Service.
A response example would look like:
NAME TYPE CLUSTER-IP EXTERNAL-IP PORT(S) AGE
kubernetes ClusterIP 10.96.0.1 <none> 443/TCP 10h
my-service LoadBalancer 10.109.250.82 <pending> 8080:30000/TCP 64s
- Command 10: get nodes
The command:
kubectl get nodes <flags>
Description:
Returns a list of nodes.
Commonly used options:
-
Flag 1: -n | --namespace
By default,kubectl get nodesreturns a list of all the nodes within thedefaultnamespace. To get nodes from another namespace, use the--namespaceflag, followed by the namespace's name.kubectl get nodes --namespace=kube-system
A response example would look like:
NAME READY STATUS RESTARTS AGE
coredns-6d4b75cb6d-jz8r9 1/1 Running 0 54m
etcd-minikube 1/1 Running 0 54m
kube-apiserver-minikube 1/1 Running 0 54m
kube-controller-manager-minikube1/1 Running 0 54m
kube-proxy-g75dw 1/1 Running 0 54m
kube-scheduler-minikube 1/1 Running 0 54m
storage-provisioner 1/1 Running 1 (54m ago) 54m
- Command 11: get replica sets
The command:
kubectl get rs
Description:
Get replica sets.
Basically, when you create a deployment, it also creates a ReplicaSet under the hood. With kubectl get rs you can see all the replica sets which were created. Although you can create ReplicaSets directly, it is not recommended, and you should always be using deployments to do it for you.
Basically kubectl get deployments & kubectl get rs are both doing the same thing, only in the latter you could also see the replicaSet's hash, where in the former it is hidden from you, and you can only see the deployment's name.
- Command 12: show logs of pod
The command:
kubectl logs <pod-name> -n <namespace-name> -f
Description:
Show logs inside a pod.
- Command 13: kubectl exec
The command:
kubectl exec -it -n <namespace-name> <pod-name> -c <container-name> -- sh
Description:
Using this command you can:
- Execute a command inside a running pod.
- Execute a command inside a running container inside of a running pod.
If the -n flag is omitted, the command searches for the pod name inside the default namespace. If the -c flag is omitted, you are ssh'ing to the pod, and if you are adding the -c flag, you are ssh'ing into the container inside the running pod.
This command is very similar to the docker exec command. It allows us to take any of the pods inside our cluster, and execute any command we want inside of the running container inside of the pod.
Common Use-Case:
By running the following command:
kubectl exec -it -n solve-dev solvebe-admin-server-3d45e6 -c solve-admin-server -- sh
we try to resolve the "nginx" name from inside of the container which belongs to "pod-name". The response should look like:
Name: nginx.default.svc.cluster.local
Address: 10.106.227.35
The value "10.106.227.35" under IP address is what we got back from the DNS server when we made the request nslookup nginx. But where does this IP come from? If you type in the command:
k get svc
You should see:
NAME    CLUSTER-IP
nginx   10.106.227.35
And notice that the 2 IPs match! They're identical.
Now kubernetes is able to resolve the name of the service, to the corresponding ClusterIP.
- Command 14: port-forward
The command:
kubectl port-forward TYPE/NAME [options] [LOCAL_PORT:]REMOTE_PORT [...[LOCAL_PORT_N:]REMOTE_PORT_N]
Description:
You way of connecting to a pod from the host.
The kubectl port-forward command in Kubernetes allows you to forward one or more local ports to a port on a Pod (or other Kubernetes resource like a Service). This is useful for debugging or temporarily accessing services running inside your cluster without exposing them externally.
Use resource type/name such as deployment/my_deployment to select a pod. Resource type defaults to pod if omitted.
Common Use-Case:
Accessing a web app running in a pod:
kubectl port-forward svc/my-service 8080:80
You can now access the service at http://localhost:8080.
Listen on port 8888 locally (on the host), forwarding to port 5000 in the pod:
kubectl port-forward pod/mypod 8888:5000
Listen on ports 5000 and 6000 locally, forwarding data to/from ports 5000 and 6000 in the pod:
kubectl port-forward pod/mypod 5000 6000
Listen on ports 5000 and 6000 locally, forwarding data to/from ports 5000 and 6000 in a pod selected by the deployment
kubectl port-forward deployment/mydeployment 5000 6000
Listen on port 8443 locally, forwarding to the targetPort of the service's port named "https" in a pod selected by the service
kubectl port-forward service/myservice 8443:https
Notes:
- This is a temporary and local-only tunnel; it's not for production use.
- It requires
kubectlto stay running in your terminal. - You must have access to the pod via your Kubernetes context.
- Command 15: describe pod
The command:
kubectl describe pod <pod-name>
Description:
Get a full description about a specific pod (identify by name).
Some really useful information coming from the response is:
-
name: name of the pod
-
namespace: the namespace it belongs to (automatically assigned to default).
-
Start time: the start time of the pod.
-
Status: the status of the pod (running, stopped, etc.)
-
IP: the IP address which was assigned to this specific pod. Note that this is an internal IP address! You will not be able to connect to it from outside. In order to be able to connect to pods, you have to create services in kubernetes.
-
Containers & Container ID: Containers hold a list of all docker containers which are running inside of our pod. An item on that list would have a container ID, which is the container ID that was generated/given to it.
-
Controlled By: this field is related to a subject called deployment - where many identical pods are considered as one collection, and so with this field we could see who controls all those identical pods. This fields basically says: "I belong to this deployment". The value here looks something like:
ReplicaSet/DEPLOYMENT_NAME-<replicaSet-hash> -
Image: which image was utilized for this particular container. That's the image which was specified using the --image flag upon creation of the pod.
-
Events: in the events section you can see a message saying the pod was successfully assigned to minikube node, a message about the image which was pulled, creation of the container, and starting of tat container.
- Command 16: describe deployment
The command:
kubectl describe deployment DEPLOYMENT_NAME
Description:
Get details about a specific deployment.
A response example would look like:
Name: nginx-deployment
Namespace: default
CreationTimestamp: Thu, 15 Sep 2022 23:33:18 +0300
Labels: app=nginx-deployment
Annotations: deployment.kubernetes.io/revision: 1
Selector: app=nginx-deployment
Replicas: 1 desired | 1 updated | 1 total | 1 available | 0 unavailable
StrategyType: RollingUpdate
MinReadySeconds: 0
RollingUpdateStrategy: 25% max unavailable, 25% max surge
Pod Template:
Labels: app=nginx-deployment
Containers:
nginx:
Image: nginx
Port: <none>
Host Port: <none>
Environment: <none>
Mounts: <none>
Volumes: <none>
Conditions:
Type Status Reason

---

Available True MinimumReplicasAvailable
Progressing True NewReplicaSetAvailable
OldReplicaSets: <none>
NewReplicaSet: nginx-deployment-85c6d5f6dd (1/1 replicas created)
Events:
Type Reason Age From Message

---

Normal ScalingReplicaSet 11m deployment-controller Scaled up replica set nginx-deployment-85c6d5f6dd to 1
The details in the response above are:
-
Name: The name of the deployment, which was given by the developer.
-
Namespace: The namespace where the deployment lives. Defaults to
default. -
Label: kubernetes automatically assigns labels to each deployment, which appears as something like:
app=DEPLOYMENT_NAME -
Annotations: Created automatically.
-
Selectors: Selectors are used in order to connect pods to a deployment. In kubernetes, pods & deployments are actually separate objects, so we need some system to know how to assign a pod to a deployment. After creating a new deployment, which creates both a deployment, and a new pod, we would see the same selector on the pod, as well as on the deployment.
-
Replicas: here we see 5 groups:
desired,updated,total,available,unavailable. Desired is the easiest one to explain. It's the number of pods you wanted in the first place. In the best scenario possible, this number would match the number of available pods. But things can go bad, and a pod can go down, so that's theunavailablegroup. -
StrategyType: Here we see the value RollingUpdate. This field tells how to perform updated of deployments. We will get back to it a bit later in this course.
-
Pod Template: notice the corresponding label here, which is "app=nginx-deployment", the same label that is mentioned in the label field. As I've mentioned, that's how the deployment is connected to its pods.
-
Events: events related to this particular deployment. Here in our case, we can see a single event called "ScalingReplicaSet". But what is a Replica Set? A bit above the event field you see a field called "NewReplicaSet".
-
NewReplicaSet: a replica set manages all pods related to a deployment, and a replica set is a set of replicas of your application, those are different pods in the same deployment, which all of them are included in the replica set. In our case we see
nginx-deployment-<some-id>. And that why we see here under events, such replica with a message saying "scaled up to 1", meaning 1 pod. One pod was created in this replica set.
- Command 17: describe service
kubectl describe service <my-service>
Description:
Display detailed information about a Service.
A response example would look like:
Name: my-service
Namespace: default
Labels: app=nginx-deployment
Annotations: <none>
Selector: app=nginx-deployment
Type: LoadBalancer
IP Family Policy: SingleStack
IP Families: IPv4
IP: 10.109.250.82
IPs: 10.109.250.82
Port: <unset> 8080/TCP
TargetPort: 3000/TCP
NodePort: <unset> 30000/TCP
Endpoints: 172.17.0.3:3000,172.17.0.4:3000,172.17.0.6:3000
Session Affinity: None
External Traffic Policy: Cluster
Events: <none>
-
IP: The
ipattribute of eachserviceis auto-generated & assigned by kubernetes. Theipof aserviceserves as the entry point to it. By runningcurl <clusterUrl-serviceIP>on a live kubernetes cluster, you'd get a response from one of the endpoints (a.k.a.pods) attached to thatservice. Kubernetes will decide for you whichpodwould be the one to answer each particular request. In the example guide on the youtube channel, he used an express server which responded withhello from ${os.hostname()}, and that way, even though all pods are identical, he was able to determine whichpodwas the one serving the request, and gave back an answer, because the hostname included the replicaSet's hash, AND the specific hash for that servingpod. The concatenation of the replicaSet has + the pod's hash make up for the NAME of the pod. -
endpoints: The
endpointsattribute contains all thepodsrelated to thisservice. Load will be distributed across these endpoints. Notice the port number 3000 at the end of each endpoint in the response example above? That's because we ran the commandkubectl expose deploymentwith a flag known as--target-portand set its value to 3000. -
TargetPort: The
TargetPortattribute in the response also mentions this exact same value, 3000. -
port: The
portattribute is consistent with the --port=8080 flag which was used. The is the port which theservicewill serve requests upon. -
selector: The
selectorattribute marks how this service is actually connected to those particular pods. All those pods also have the exact same label. -
namespace: The
namespacewhere the service lives. It will be set todefaultif not specified otherwise, and it is same for all the pods that are linked to it, and the matching deployment.
- Command 18: manually delete a pod
The command:
kubectl delete pod <pod-name>
Description:
Deletes a pod by name.
A pod that's deleted, which was manually created, would be deleted forever.
A pod that's deleted, which was created by a deployment, would also be deleted forever, but a few seconds later, the deployment would take care of creating a new pod to take its place, and that pod would have a different hash and a different IP address.
- Command 19: manually create pod
The command:
kubectl run <name> --image=IMAGE_NAME
Description:
A way to manually create a pod.
kubectl run command is very similar to the docker run command. Just as docker run creates one docker container, kubectl run creates one single pod. kubectl run creates a new pod, and inside it, pulls the image you specified, and runs a new container based on that.
We usually don't use this command to create new pods. We would use create deployment for that purpose instead.
- Command 20: manually create deployment
The command:
kubectl create deployment DEPLOYMENT_NAME --image=IMAGE_NAME
Description:
Creates a new deployment with exactly 1 new pod.
The deployment is given the name you specified. deployment-name is a required field. image-name is a required field.
Inside the newly created pod, an image is pulled, built, and a container starts to run. This is according to the image you provided. A deployment can later be scaled up, or down as you like, to include more pods.
Even if you want a deployment to have just 1 pod, it is still more reasonable to create a deployment with 1 pod, instead of creating 1 pod outside of a deployment using the kubectl run command (A command which creates a pod). There are 3 reasons for that:
- Scale: Creating a pod with
kubectl rundoesn't let you scale. You wouldn't be able to increase the quantity of the pods if you needed to. - Failure: If the pod created outside a deployment dies for some reason, it won't restart itself.
- Load Balancing: In a case of 2+ pods, even if you've found a way to get around the 2 points above, and create an army of pods, you'd still need to create your own mechanism for load balancing. A deployment basically acts as a load balancer out of the box automatically for you.
For those reasons mentioned above, the most common way to create pods (whether it's 1 or 2+ identical ones) is by wrapping them in a deployment. With a deployment, you're able to increase or decrease the quantity of the pods, modify configuration, and so much more. It would even distribute the load (load-balancing) automatically for you! That's the whole purpose of the deployment. A minimal downside to this is that you won't be able to know which pod exactly gave you back the response, but is it really a downside though? I mean, they're 100% identical.
Commonly used options:
-
Flag 1: -n | --namespace
By default,kubectl create deploymentcreates a deployment in thedefaultnamespace. To create a deployment in another namespace, use the--namespaceflag, followed by the namespace's name.kubectl create deployment DEPLOYMENT_NAME --image IMAGE_NAME --namespace=frontend
A response example would look like:
deployment.apps/nginx-deployment created
Google's Documentation: Deployments represent a set of multiple identical Pods with no unique identities. A Deployment runs multiple replicas of your application and automatically replaces any instances that fail or become unresponsive. In this way, Deployments help ensure that one or more instances of your application are available to serve user requests. Deployments are managed by the Kubernetes Deployment controller.
- Command 21: manually expose a deployment
The command:
kubectl expose deployment <deploy-name> --type=LoadBalancer --name=<my-service> --port=<port> --target-port=<tar-port>
Description:
Create a service object that exposes the deployment.
Commonly used options:
-
Flag 1: --target-port
The port number on the container that the service should direct traffic to.kubectl expose deployment nginx-deployment --type=LoadBalancer --name=my-service --port=8000 --target-port=80 -
Flag 2: --port
The port number on theserviceto which external resources should tap into.kubectl expose deployment nginx-deployment --type=LoadBalancer --name=my-service --port=5000 --target-port=80
A response example would look like:
service/my-service exposed
- Command 22: manually scale a deployment
The command:
kubectl scale deployment DEPLOYMENT_NAME --replicas=#number
Description:
Scales a deployment by its name, and increases/decreases the number of pods living inside it according to the number of replicas provided, and based on the number of replicas currently living in the deployment.
A response example would look like:
deployment.apps/nginx-deployment scaled
- Command 23: manually delete all resources
The command:
kubectl delete all --all
Description:
How to delete all quickly. Deletes all the pods, all the deployments, and all the services we've created.
With kubectl, there's an option to delete everything quickly, and that could be done with the delete all command. Note that this action does not kill immediately!
If you were to run:
kubectl get pods
immediately after the delete all command, you'll see some pods are still alive! However notice their status, it's marked as Terminating. Also, note that this command also deleted the default service created by Kubernetes, which is also called Kubernetes, but this service got re-created again. Check its AGE and you'll see that it's only alive for a few seconds.
- Command 24: set image
The command:
kubectl set image DEPLOYMENT_NAME=talkohavy/img-name:2.0.0
Description:
...
- Command 25: rollout status deploy
The command:
kubectl rollout status deploy DEPLOYMENT_NAME
Description:
...
3. Minikube Commands
A minikube cluster consists of 1 node, that serves both as the master node & the worker node, looks like that:
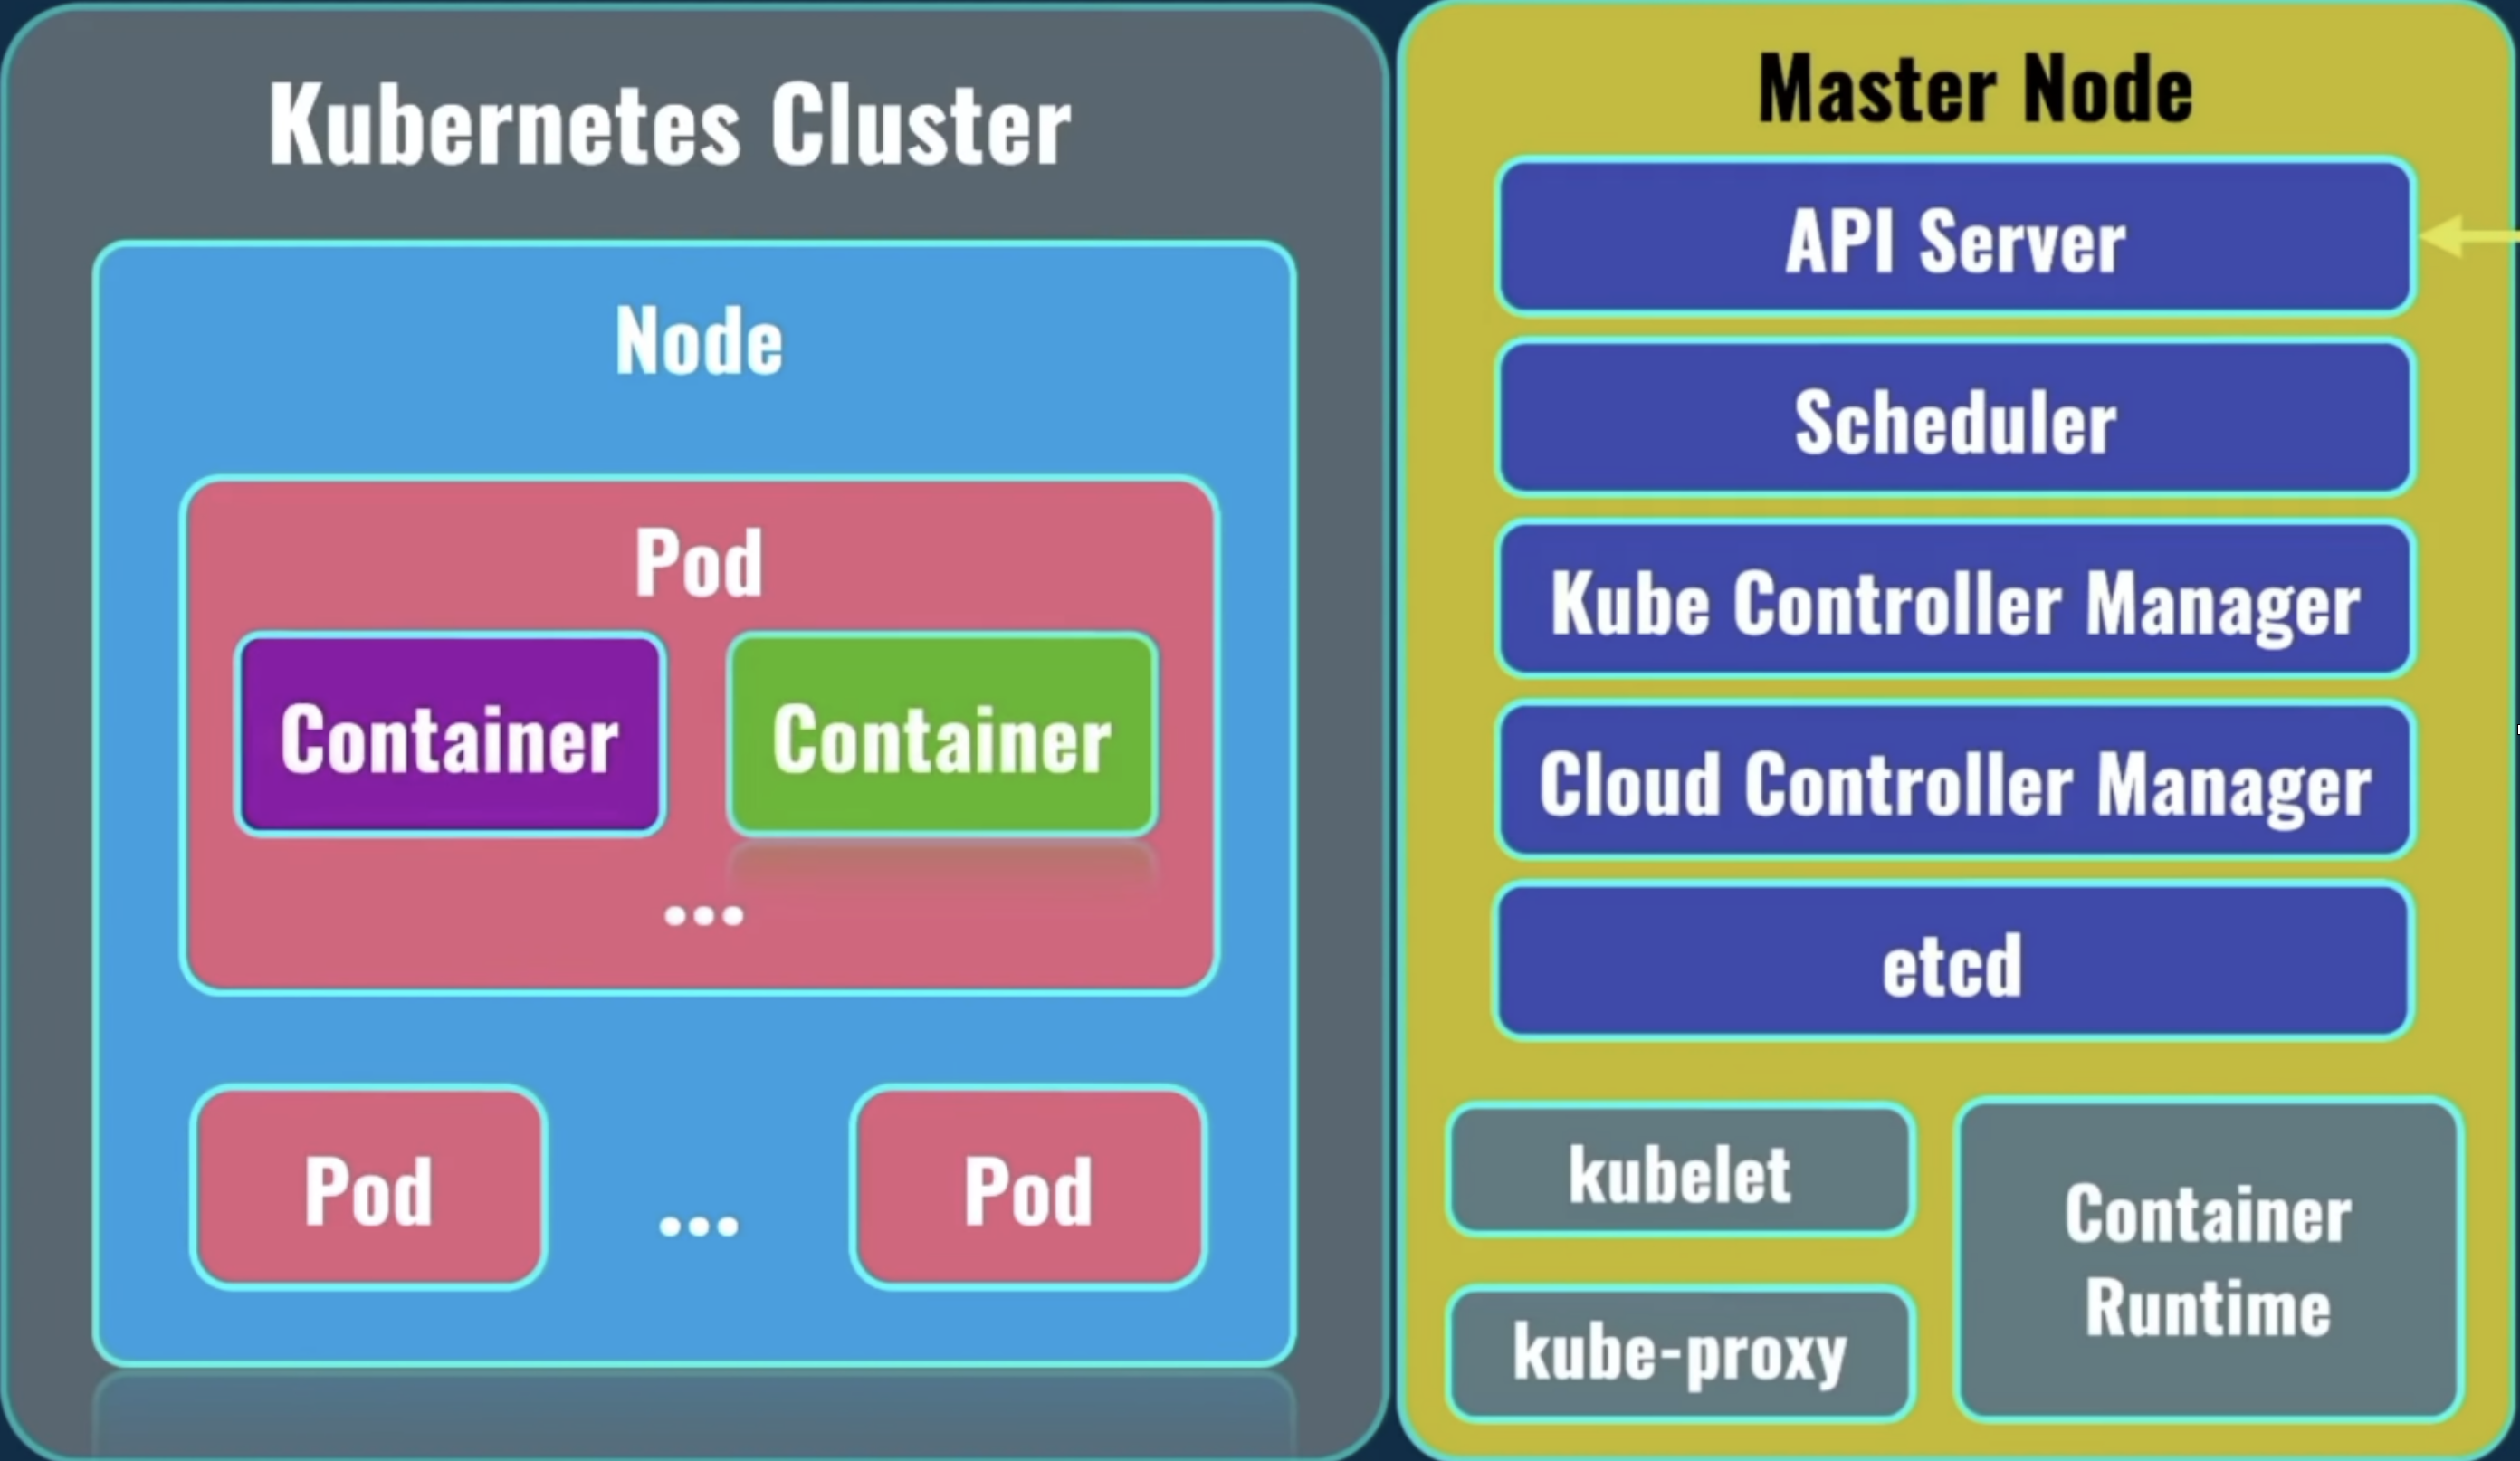
On the left, you can see at the top level the Kubernetes Cluster. Under the Kubernetes Cluster, there could be 1 or more nodes (servers). Minikube used to have only 1 (it can now have more). Under the Node, there could be 1 or more pods. Under the pod, there could be 1 or more containers. Usually? A pod holds only 1 container.
When creating a minikube cluster for the first time, by default, it's created with:
- 1 kubernetes cluster
- 1 node (that acts like both the master & worker node)
- 1 pod
- Command 1: minikube delete
The command:
minikube delete
Description:
Deletes a local Kubernetes cluster. This command deletes the VM, and removes all associated files.
- Command 2: minikube profile list
The command:
minikube profile list
Description:
Lists all minikube profiles. Lists all valid minikube profiles and detects all possible invalid profiles.
A response example would look like:
- Deleting "minikube" in docker ...
- Deleting container "minikube" ...
- Removing C:\Users\tal\.minikube\machines\minikube ...
- Removed all traces of the "minikube" cluster.
- Command 3: minikube profile
The command:
Set profile as default:
minikube profile profile_name
Get current profile:
minikube profile
Description:
profile sets the current minikube profile, or gets the current profile if no arguments are provided. This is used to run and manage multiple minikube instances. You can return to the default minikube profile by running minikube profile default
- Command 4: minikube start
The command:
If it's your 1st time running this command:
- Option 1: start a cluster using the docker driver
minikube start --driver=docker --profile profile_name
- Option 2: make docker the default driver, then you could use short:
minikube start
minikube config set driver docker
minikube start
If it's your 2nd+ time running this command:
minikube start
Description:
Starts a kubernetes cluster locally on your machine.
For this command to work, your machine's Docker Engine needs to be running. It should take a few minutes to start a minikube cluster. That cluster has only 1 node, which acts as both the master node & the worker node.
The cluster is created with a default profile called minikube, which you could override using the --profile (-p) flag:
minikube start --profile prod
A response example would look like:
- minikube v1.26.1 on Microsoft Windows 10 Home 10.0.19044 Build 19044
- Using the docker driver based on user configuration
- Using Docker Desktop driver with root privileges
- Starting control plane node minikube in cluster minikube
- Pulling base image ...
  > gcr.io/k8s-minikube/kicbase: 74.85 MiB / 386.61 MiB 19.36% 4.79 MiB p/s
- Command 5: minikube stop
The command:
minikube stop
Description:
Stops a running local Kubernetes cluster.
Stops a local Kubernetes cluster. This command stops the underlying VM or container, but keeps user data intact. The cluster can be started again with the "start" command.
A response example would look like:
- minikube v1.26.1 on Microsoft Windows 10 Home 10.0.19044 Build 19044
- Using the docker driver based on user configuration
- Using Docker Desktop driver with root privileges
- Starting control plane node minikube in cluster minikube
- Pulling base image ...
  > gcr.io/k8s-minikube/kicbase: 74.85 MiB / 386.61 MiB 19.36% 4.79 MiB p/s
- Command 6: minikube status
The command:
minikube status --profile profile_name
Description:
Shows the status of your kubernetes cluster.
A response example would look like:
A good response would look like:
minikube
type: Control Plane
host: Running
kubelet: Running
apiserver: Running
kubeconfig: Configured
If a cluster does not exist, the response would appear as such:
Profile "minikube" not found.
- Command 7: minikube ip
minikube ip --node node_name --profile profile_name
Description:
Returns the IP address of the specified node.
Commonly used options:
-
Flag 1: -n | --node
By default, it returns the ip of the node which is considered as the primary control plane. To get the ip of some other node, use the-n,--nodeflag followed by its name.minikube ip --node luckylove
- Command 8: minikube node list
minikube node list
Description:
Returns a list of all nodes inside the minikube cluster.
A response example would look like:
minikube 192.168.49.2
- Command 9: minikube ssh
minikube ssh --node node_name --profile profile_name
Description:
A way to connect to your minikube environment (for debugging).
With this command you don't even need to enter a password! So it's much more comfortable.
A response example would look like:
docker@minikube:~$
We can learn from the output above that when we ran minikube start to create the cluster, minikube by default created a username called "docker", with a default password of "tcuser".
- Username: docker
- Password: tcuser
- Command 10: minikube service
minikube service -n <namespace> name_of_service
Description:
In case of a NodePort type of service, this is a way to open up a service in your default browser, without having to know the auto-generated ip address of your node. The ip address which was assigned when using the expose deployment --type=NodePort command. You could use the flag --url, to get back only the url, without opening a web browser.
- Command 11: minikube tunnel
minikube tunnel
Description:
4. What is Kubernetes? (K8S)
- Introduction
Kubernetes is a CONTAINER ORCHESTRATION system. It is an open-source tool which specializes in deploying containerized applications to production.
Using docker, you can create as many containers as you want. However, what if you need to create a network of multiple containers running on different computers/servers, and have them talk with each other? Using docker alone, creating this network would prove to be a hard task. Kubernetes rose to the challenge, and it helps you do just that - create containers on different servers (either physical or virtual) and create this network to allow them to communicate with each other. This network creation is being done automatically, without the user's intervention.
The user's only job is to tell kubernetes how many containers you wanna create, based on a specific image you name.
- Kubernetes Responsibilities
K8s takes care of:
- Automatic deployment of the containerized applications across different servers. As mentioned, servers could be either physical, or virtual. Virtual servers are more common these days. Almost no-one uses a physical one.
- Distribution of the load across multiple servers.
- Auto-scaling of the deployed applications
- Monitoring & health-check of the containers.
- Replacement of the failed containers. In case some containers fail for some reason. All that is being done without your intervention.
- On what types of environments can k8s run?
Docker is just one of the possible options for k8s to work with. Docker belongs to a family known as "container runtime". K8S supports more than one container runtime! It doesn't matter which one you choose, but once you choose? All application parts must use the same container runtime. Nowadays, Kubernetes supports these types of container runtimes:
5. Kubernetes Architecture & Concepts
Let's start with some terminology and talk about the architecture of kubernetes:
- Concept 1: A Pod
A Pod is the smallest unit that exists within the kubernetes world.
Note that container is the smallest unit that exists within the docker world. In kubernetes however, it is the pod.
Containers are created INSIDE a pod!
Inside the pod, there could be one or more containers, although the most common scenario is to have a single container running inside a pod. One pod, one container.
- Concept 2: A Kubernetes Cluster & node
A kubernetes cluster consists of nodes.
A node is actually a server.
You can include multiple nodes (servers) inside a kubernetes cluster, and they could be located in different data-centers in different parts of the world. But usually, nodes which belong to the same kubernetes cluster are located close to each other. This is in order to perform tasks more efficiently.
Inside each node, there are pods, and inside of each pod there are containers (usually just 1). Each pod can have a pod sibling, meaning that they're both living under the same deployment, or a pod cousin, meaning that they're both living under different deployments.
Nodes will not automatically form a cluster without your intervention! But after such initial configuration, everything will be automated. And kubernetes will automatically deploy pods on different nodes.
- Concept 3: Deployment
-- A. Core Concept
-
Purpose: A Deployment is a higher-level abstraction that builds on top of ReplicaSets. It adds declarative updates to applications, allowing you to describe the desired state for your application and automatically handles the deployment process.
-
Rolling Updates and Rollbacks: Deployments support rolling updates, allowing you to update your application with minimal downtime by gradually replacing old Pods with new ones. If something goes wrong, Deployments support easy rollbacks to a previous version.
-
Declarative Configuration: Deployments use a declarative configuration to define the desired state of the application, making it easier to manage and update. You define the desired state, and the Deployment controller takes care of making it happen.
-- B. Selectors
Selectors are used in order to connect pods to a deployment. In kubernetes, pods & deployments are actually separate objects, so we need some kind of system to know how to assign a pod to a deployment. If you were to use the manual way to create a new deployment (which creates both a deployment and a new pod), you should see the same selector on the pod, as well as on the deployment.
-- C. ReplicaSet
Deployments use ReplicaSets under the hood!!!
Behind the scenes, a deployment manages a ReplicaSet. When you create a Deployment, it creates and manages the associated ReplicaSets to ensure the desired number of replicas are running. A ReplicaSet's purpose is to maintain a stable set of replica Pods running at any given time. As such, it is often used to guarantee the availability of a specified number of identical Pods.
Here are the key components and concepts associated with a ReplicaSet:
-
Purpose: The primary purpose of a ReplicaSet is to maintain a specified number of replica Pods running at all times. It doesn't provide higher-level deployment features such as rolling updates or rollbacks.
-
Updates: If you need to update the application running in your Pods (e.g., updating the container image), you typically need to manually delete the existing ReplicaSet and create a new one with the updated configuration. This approach can result in downtime during the transition.
-
Desired State: A ReplicaSet specifies the desired number of replicas (identical copies) of a Pod that should be running. This is defined using the replicas field in the ReplicaSet configuration.
-
Pod Template: The ReplicaSet uses a template to create new Pods. The template specifies the characteristics of the Pod, such as the container image, volumes, and other settings. When the ReplicaSet creates new Pods, it uses this template.
-
Selector: The ReplicaSet uses a label selector to identify the Pods it is managing. The selector is defined in the ReplicaSet configuration and matches the labels assigned to the Pods.
-
Scaling: The primary purpose of a ReplicaSet is to maintain the desired number of replicas. If the actual number of Pods deviates from the desired state (either too many or too few), the ReplicaSet controller takes corrective actions to scale the number of Pods up or down.
Use Cases:
-
ReplicaSet: Use a ReplicaSet when you need a basic way to ensure a certain number of identical Pods are always running. If you don't need advanced deployment features like rolling updates and rollbacks, a ReplicaSet may be sufficient.
-
Deployment: Use a Deployment when you want to manage the deployment and scaling of applications more declaratively. Deployments are particularly useful when you need to update your application without downtime, handle rollbacks, or manage multiple environments (e.g., development, staging, production) with different configurations.
Recommendations:
For most use cases, it is recommended to use Deployments over ReplicaSets. Deployments provide more features, including rolling updates and rollbacks, making application updates smoother and less error-prone. Deployments are considered a higher-level abstraction that abstracts away some of the complexities associated with managing replica sets directly.
In summary, while ReplicaSets are a fundamental building block for managing replicated Pods, Deployments offer a higher-level abstraction with additional features that simplify the management of application updates and scaling. Deployments are generally preferred for managing applications in a production environment.
• How does a ReplicaSet work
A ReplicaSet is defined with fields, including a selector that specifies how to identify Pods it can acquire, a number of replicas indicating how many Pods it should be maintaining, and a pod template specifying the data of new Pods it should create to meet the number of replicas criteria. A ReplicaSet then fulfills its purpose by creating and deleting Pods as needed to reach the desired number. When a ReplicaSet needs to create new Pods, it uses its Pod template. A ReplicaSet is linked to its Pods via the Pods' metadata.ownerReferences field, which specifies what resource the current object is owned by. All Pods acquired by a ReplicaSet have their owning ReplicaSet's identifying information within their ownerReferences field. It's through this link that the ReplicaSet knows of the state of the Pods it is maintaining and plans accordingly. A ReplicaSet identifies new Pods to acquire by using its selector. If there is a Pod that has no OwnerReference or the OwnerReference is not a Controller and it matches a ReplicaSet's selector, it will be immediately acquired by said ReplicaSet.
-- D. Deployment Replicas
Replicas represents the state of a deployment.
When you run the command:
kubectl describe deployment
One of the fields shown on screen is Replicas.
The output of it would look something like:
Replicas: 3 desired | 1 updated | 4 total | 3 available | 1 unavailable
Here we see 5 groups: desired, updated, total, available, unavailable.
The combination of these groups define the current state of a deployment at a given time.
desired
This one is the easiest one to explain. It's the number of pods you wanted the deployment to have in the first place. A deployment will aim to be in that number. Best case scenario, the number underdesiredwould match the number underavailable.availableThe number of pods currently available to serve. Can be lower or higher than the number of desired pods.unavailableThings can go bad, and a pod can go down. That's theunavailablegroup.total...updated...
-- E. Deployment's StrategyType
When you run the command:
kubectl describe deployment
One of the fields shown on screen is StrategyType.
This field tells how to perform updated of deployments, basically for when you're updating an image's version. The default value is RollingUpdate.
What does RollingUpdate mean?
When you release a new version of your application, of course you want to roll out this new version in production smoothly, without breaking any of the services. Kubernetes allows that right out of the box, and it's very easy to utilize. This RollingUpdate type means that new pods will be created with the newer image, while the old pods would still be running. So essentially old pods would get replaced one by one, and finally after some time, there would only be new pods, running the new image.
• When does this happen and how?
You just modified your application. You made changes and you save them. You will now use docker to build an image from your updated version of your application, and to that image you'd probably provide a new tag, like 1.0.1. After building the image, you'd probably publish it to some docker-hub-like center. Now, here comes kubernetes part. Inside the cluster, you probably have some deployment running N pods, right? All those pods are running the previous version of that image, but hey here comes a new one! So step 1 is to go to that deployment's yaml, update the image's version for that deployment to the new version. We do that by using the command:
kubectl set image DEPLOYMENT_NAME DEPLOYMENT_NAME=talkohavy/img-name:2.0.0
After entering this command, the image would be changed, and a roll out update would kick off! Right after that you'd see a console log saying:
deployment.apps/DEPLOYMENT_NAME image updated
Be read to quickly run this following command immediately afterwards:
kubectl rollout status deploy DEPLOYMENT_NAME
This would show you live ongoing feedback on the status of the rollout update. The output would be something similar to:
Waiting for deployment DEPLOYMENT_NAME rollout to finish: 3 out of 4 replicas have been updated
Waiting for deployment DEPLOYMENT_NAME rollout to finish: 3 out of 4 replicas have been updated
Waiting for deployment DEPLOYMENT_NAME rollout to finish: 3 out of 4 replicas have been updated
Waiting for deployment DEPLOYMENT_NAME rollout to finish: 1 old replicas are pending termination
...
deployment DEPLOYMENT_NAME successfully rolled out
Now let's see all pods by running the command:
kubectl get pods
and notice the age of those pods. All of them should say RUNNING, and all have been created only a few seconds ago. Also, of course, all the hashes are new hashes. That's it! We are now running a new version of our application! 02:09:55
- Concept 4: Service
-- A. What is a Service?
A Service is an abstract way for exposing an application running on a set of Pods as a network service.
A service has 2 main purposes:
- Define a logical set of pods and a policy by which to access them.
- Load balance the work-load between the set of pods it is in-charge of.
The set of pods targeted by a service is usually determined by a selector.
A service in kubernetes is a REST object, similar to a pod. Being a REST object, it means that a Service can be created, updated or deleted. It could also be read in the sense of getting information about it (with the describe command). To be more specific, saying that a service is a REST object means that you can send a POST request with a service definition to the API server to create a new instance.
-- B. Why do we need a Service?
If you use a deployment to run your app (which you probably are), it can create and destroy pods dynamically. Kubernetes pods are created and destroyed all the time in order to match the desired state you mentioned in your deployment's yaml. What this means is that pods are nonpermanent resources. Each pod gets its own IP address, however in a deployment, a set of pods running in one moment in time could be different from the set of pods running in that deployment a moment later. This leads to a problem. Consider a stateless image-processing server which is running with 3 replicas. Those replicas are identical — The "frontend" pods do not care which image-processing server would reply/serve their request. While the actual "backend" pods may change, the "frontend" pods do not need to be aware of that, nor do they need to keep track of the actual set of the "backend" pods themselves.
The Service abstraction enables this decoupling.
-- C. Service Types
Type 1: ClusterIP (the default)
ClusterIP is the default Service type which assigns an IP address from a pool of IP addresses that your cluster has reserved for that purpose.
ClusterIP is a type you can use to expose a deployment internally inside the cluster.
A service of type ClusterIP would allows you to connect to its pods only from within the kubernetes cluster. This is great when your kubernetes cluster has a database deployment for example, like mongodb or mysql, which of course should not be available & accessible from the outside world.
When choosing the type Cluster IP, a service would be created with a new virtual IP address assigned to it. Upon its creation you'd be asked to name a deployment to which this service would be linked to. kubernetes would then do all sorts of magic behind the scenes, which essentially gives this service a matching label as that of the deployment.
With the new virtual IP address given to the new service you'd be able to connect to that specific deployment and get responses from its pods. Also, with this service, kubernetes will distribute the load across the different pods related to that deployment.
Type 2: NodePort
NodePort is a type you can use to expose a deployment externally outside the cluster.
When we want to grant access to a deployment to the outside world, we pick a service of type NodePort. Typically, this is something we want for our frontend server deployment, and perhaps also our api-gateway deployment.
If you set the service's type to NodePort, the Kubernetes control plane allocates a port from a range specified by --service-node-port-range flag (default: 30000-32767). Each node proxies that port (the same port number on every Node) into your Service. Your Service reports the allocated port in its .spec.ports[*].nodePort field.
Using a NodePort gives you the freedom to set up your own load balancing solution, to configure environments that are not fully supported by Kubernetes, or even to expose one or more nodes' IP addresses directly.
For a node port Service, Kubernetes additionally allocates a port to match the protocol of the Service. Every node in the cluster configures itself to listen on that assigned port and to forward traffic to one of the ready endpoints (pods) associated with that Service. You'll be able to contact the type: NodePort Service, from outside the cluster, by connecting to any node using the appropriate protocol (for example: TCP), and the appropriate port (as assigned to that Service).
Choosing your own port
If you want a specific port number, you can specify a value in the nodePort field. The control plane will either allocate you that port or report that the API transaction failed. This means that you need to take care of possible port collisions yourself. You also have to use a valid port number, one that's inside the range configured for NodePort use.
Example:
apiVersion: v1
kind: Service
metadata:
  name: my-service
spec:
  type: NodePort
  selector:
    app.kubernetes.io/name: MyApp
  ports:
    - port: 80
      # By default and for convenience, the `targetPort` is set to
      # the same value as the `port` field.
      targetPort: 80
      # Optional field
      # By default and for convenience, the Kubernetes control plane
      # will allocate a port from a range (default: 30000-32767)
      nodePort: 30007
Type 3: LoadBalancer
On cloud providers which support external load balancers, setting the type field to LoadBalancer provisions a load balancer for your Service. The actual creation of the load balancer happens asynchronously, and information about the provisioned balancer is published in the Service's .status.loadBalancer field. For example:
apiVersion: v1
kind: Service
metadata:
  name: my-service
spec:
  selector:
    app.kubernetes.io/name: MyApp
  ports:
    - protocol: TCP
      port: 80
      targetPort: 9376
  clusterIP: 10.0.171.239
  type: LoadBalancer
status:
  loadBalancer:
    ingress:
    - ip: 192.0.2.127
Traffic from the external load balancer is directed at the backend Pods. The cloud provider decides how it is load balanced.
To implement a Service of type: LoadBalancer, Kubernetes typically starts off by making the changes that are equivalent to you requesting a Service of type: NodePort. The cloud-controller-manager component then configures the external load balancer to forward traffic to that assigned node port.
Visual example through minikube:
I've created a service of type LoadBalancer, fetched its details, and I want to show you something interesting.
I've created a service manually with:
(this hardly makes any different whether it's declarative or imperative)
kubectl expose deployment DEPLOYMENT_NAME --type=LoadBalancer --port=<port>
And now let's do get services immediately afterwards:
kubectl get services
You'd see something like this:
NAME TYPE CLUSTER-IP EXTERNAL-IP PORT(S)
my-service LoadBalancer 10.109.195.184 <PENDING> 3000:32268/TCP
The important thing I want you to notice is the part that says:
External=ip is pending
You will see <PENDING> if you're using minikube, but when deploying the application by using one of the big known cloud providers, like amazon & google cloud, you will see a load balancer ip address assigned automatically.
When using with minikube though, this will forever stay in this <PENDING> state, and would result in a behavior that is exactly the same as NodePort type, meaning we will still be able to connect to our deployment using the IP address of the node.
Type 4: ExternalName
Services of type ExternalName map a Service to a DNS name, not to a typical selector such as my-service or cassandra. You specify these Services with the spec.externalName parameter.
This Service definition, for example, maps the my-service Service in the prod namespace to my.database.example.com:
apiVersion: v1
kind: Service
metadata:
  name: my-service
  namespace: prod
spec:
  type: ExternalName
  externalName: my.database.example.com
When looking up the host my-service.prod.svc.cluster.local, the cluster DNS Service returns a CNAME record with the value my.database.example.com. Accessing my-service works in the same way as other Services but with the crucial difference that redirection happens at the DNS level rather than via proxying or forwarding. Should you later decide to move your database into your cluster, you can start its Pods, add appropriate selectors or endpoints, and change the Service's type.
- Concept 5: Using Service Name for internal communication
Any resource living inside our cluster, whether it's a service or a deployment, has the potential of communicating with other resources in that cluster! All we gotta do is provide a service (which we did) that acts as the single point of entry to that deployment's pods. The entry point exposes an ip address, which other deployments can use in order to communicate with that specific deployment. However, that virtual ip address that gets exposed is DYNAMIC! And is known only AFTER creation! Therefore, it is best to use the NAME of the service inside your application, instead of that exposed ip address. As opposed to the ip address, the name is static! So even if the ip address changes, the name would still work as the hostname. That's how you could very easily connect different deployments together. Such resolution (from the word resolve) of the service-name to an ip address is performed by an internal service of the kubernetes cluster, which is called DNS.
- Concept 6: Node Communication
We talked about internal communication between Services, but what about node communication? How do those nodes actually communicate with each other? How are they managed?
Well, in a kubernetes cluster there is what's known as a master node. The rest of the nodes in the cluster are called worker nodes. It's the master node job to manage communication between worker nodes. It is also the master node's job to distribute load across worker nodes. All pods related to your application are deployed on worker node's. The master node runs in what is known as system pods, which are responsible for the actual work of the kubernetes cluster in general. Basically, we could say that a master node in a kubernetes cluster is more like "the control plane", and it does not run your client applications.
Q: So, what services actually run on different nodes?
A: Let's have a look at the following diagram...
There are services such as kubelet, kube-proxy, and a container runtime. Those services are present ON EACH NODE in the kubernetes cluster. A container runtime is the mechanism where your containers actually run. We mentioned 3: docker, containerd, CRI-O.
- Concept 7: DNS service
The DNS service is a service which runs on the master node, and is responsible for names resolution in the entire kubernetes cluster.
- Concept 8: API Server
API server service is the main point of communication between nodes inside the kubernetes world. The API server is the main service inside the master node.
Using this API server service, you could actually manage the entire kubernetes cluster. It is done by using kubectl. Or, kube-control.
- Concept 8: kubectl
Kubectl is a separate command-line tool, which allows you to connect with a specific kubernetes cluster, and manage it remotely.
kubectl could even be ran on your local machine.
Using kubectl, you could manage a remote kubernetes cluster.
It connects using REST API to the API Server service on the master node. This communication happens, of course, over https. By the way, other nodes on the cluster (i.e. worker nodes) communicate with the master node in the same fashion. What that means is that by using the kubectl tool, you could manage any remote kubernetes cluster.
That's it for the kubernetes architecture overview, and you know that:
A kubernetes cluster consists of nodes.
One of the nodes is a master node.
The master node manages the rest of the nodes, which are called worker nodes.
On each node there are pods.
Pods are created automatically by kubernetes.
Inside each pod there are containers. Usually just single container per pod.
All containers inside of a pod share same namespace of that pod (IP address, etc).
Pod are the smallest unit in kubernetes.
Pods could be created, removed, moved from one node to another, and all this happens automatically without your intervention.
API Server service is the center main point of communication between master node and other worker nodes.
Using the API Server service, you could manage the kubernetes cluster by using the kubectl tool, which has to be installed on your computer, if you perform management from your computer.
- Concept 9: kubelet
The kubelet is the primary "node agent" that runs on each node. It can register the node with the apiserver using one of:
- the hostname
- a flag to override the hostname
- or specific logic for a cloud provider.
The kubelet works in terms of a PodSpec. A PodSpec is a YAML or JSON object that describes a pod. The kubelet ensures that the containers described in those PodSpecs are running and healthy. The kubelet doesn't manage containers which were not created by Kubernetes.
Each worker node has 1 kubelet service on it, which communicates with an API server service on the master node.
- Concept 10: kube-Proxy
A kube-proxy service is found on each of the worker nodes, and is responsible for network communication within the node, and between nodes.
- Concept 11: Scheduler
There are services that are present ONLY on the master node.
One of them is the scheduler.
The scheduler is responsible for planning and distributing of the workload inside the cluster.
- Concept 12: Kube Controller Manager
Kube Controller Manager is a single point which controls everything inside the kubernetes cluster, and it controls what happens on each of the nodes in the cluster.
- Concept 13: Cloud Controller Manager
Its job is to interact with your cloud service provider, where you actually run your kubernetes cluster. Because usually you don't create these clusters to run on your own servers, instead you usually choose to run them on one of the cloud providers.
which actually performs almost automated creation of all nodes, and the connection between such nodes. And for that, you have to run Cloud Controller Manager service on the master node. Also for example if you want to create deployment of your application inside of the kubernetes cluster, which will be opened to the outside world, and allow connection from outside, you could create a load-balancer IP addresses, and those load-balancer IP addresses are usually provided by those specific cloud providers.
- Concept 14: etcd
Also on master node, there's such a thing called etcd. Etcd is a service which actually stores all logs related to the operation of the entire kubernetes cluster, and such logs are stored inside of it as key-value pairs.
6. Download & Install Minikube and Kubectl
• A. Installing Minikube
Of course you could create a cluster on one of the famous big cloud providers, like Amazon Web Services, or Google Cloud, but such services aren't offered for free. You have to pay even for creating the slowest bat-shit cluster. If you want a free solution, you could create a cluster locally on your machine, and for that there's such a tool called "minikube".
This tool could create a cluster for us, but this cluster would be a "single node cluster", where this node would be both the master node AND the worker node. Nonetheless, for our testing purposes this is just fine. In order to run minikube successfully, you have to use either a virtual machine, OR a container manager.
Here are all the virtual machines and container managers that are supported by minikube:
- VirtualBox
- VMware
- Docker
- Hyper-V
- Parallels
I suggest you go ahead and use Hyper-V if you are a windows user, and if you are a Macos user - you could go ahead with VirtualBox or VMware or Parallel.
There's also an option to run minikube as a container inside of docker. Of course, if you have docker already installed on your computer you could use it in order to create a kubernetes cluster using minikube, and essentially it will create a separate docker container, and inside of that container all pods would be created. But I personally don't recommend you go ahead with the docker option, because it comes with some limitations. For example, I was not able to change the container runtime inside of the docker container to containerd, or to CRI-O. and therefore, I recommend you go ahead with the other options I mentioned above.
By the way, Hyper-V is available on windows out-of-the-box, and you could utilize it as virtual machine manager for running minikube node. To summarize, using minikube you will create single node kubernetes cluster, but as I've mentioned before, you have to use a specific tool in order to manage this cluster, and this tool is called kubectl.
kubectl is included in minikube, but if you want to use that included version of kubectl, you'd have to state the command minikube-kubectl, which is not that convenient, therefore I recommend you would install kubectl separately. By installing kubectl as a separate tool, you will also be able to manage other kubernetes clusters, which are located remotely, for example on an AWS cloud.
On the same website, go to the Getting Started page, and under "Learning Environment" click the "See install tools". There, click on the minikube "Getting Started" link. I chose to install it using the package manager.
The install command was:
winget install minikube
After the installation, open System Environment, and Add To Path the minikube variable:
C:\Program Files\Kubernetes\Minikube
Run minikube inside a new terminal and check that it worked.
• B. Installing Kubctl
The main website for kubernetes is kubernetes.io.
It contains everything you need, from details on how to set local learning environment, production environment, and even including downloads to tools such as the kubectl.
https://kubernetes.io/docs/tasks/tools/install-kubectl-windows/
No idea how, but I already had kubectl on my windows machine!!!
Choose the option of:
_ Install on Windows using Chocolatey or Scoop _
I'm starting to like this chocolaty package manager for windows, since I've used it for several other softwares on windows.
• C. VScode Extension for k8s
If you are using VScode as your main editor (which you are), I suggest you install an extension called Kubernetes. Using such extension, you could very fast create yaml configuration files for your deployments and services in kubernetes.
In this guide we'll be creating 2 yaml configuration files for 1 single deployment, and 1 single service. Writing a yaml configuration file from scratch is practically insane, so we'd better use a helper tool to do so. Go ahead and install vscode's extension for Kubernetes called Kubernetes, with which the creation of these yaml files could be achieved extremely fast.
7. Configuration Templates
• Imperative Vs. Declarative
Up until now, we've used the imperative approach to create deployments & services. We did so by using kubectl CLI commands. But usually, that's not the way experienced developers use to create all the different objects and resources in kubernetes. In most cases, a declarative approach is used. In the declarative approach, you create a yaml configuration file or files, which describe a full recipe of how to build and create your entire cluster, all the deployments, all the services, and describes in full what should be done and in what order. After having such yaml files, we would use kubectl's apply command. Let's do an example right now.
• A. Pod Configuration
• B. Deployment Configuration
Deployments use a Pod template, which contains a specification for its Pods. The Pod specification determines how each Pod should look like: what applications should run inside its containers, which volumes the Pods should mount, its labels, and more. When a Deployment's Pod template is changed, new Pods are automatically created one at a time.
• How to Create a Deployment Using the Declarative Way
Let's create a deployment using the declarative approach.
Create a new file and name it as deployment.yaml.
At the top of it, start typing the word "deploy".
Then, the kubernetes extension would kick, and you should see an auto-completion suggestion that would fill in quite a bit of boiler-plate for you.
It's a template for creating a deployment.
It would look something like:
apiVersion: apps/v1
kind: Deployment
metadata:
  name: myapp
  namespace: default
  labels:
    app: configuration-server
spec:
  replicas: 1
  selector:
    matchLabels:
      app: myapp
  template:
    metadata:
      labels:
        app: myapp
    spec:
      containers:
      - name: myapp
        image: <image>
        ports:
        - containerPort: <Port>
        envFrom:
        - configMapRef:
            name: myconfigmapv1.0
        resources:
          requests:
            memory: "16Mi"
            cpu: "50m"
          limits:
            memory: "128Mi"
            cpu: "500m"
When using this shortcut, all places with the myapp value would be highlighted, and you could type in the name of your deployment.
-- Attributes:
-
- matchLables spec -> selector -> matchLabels inside this matchLabels key we specify which pod would be managed by this deployment.
-
-
template Right below matchLabels we have a nested template. This template describes a recipe for how to create a single pod. Right under
templatethere should appear a keykind: Pod, but because this template is under Deployment configuration, this key could be omitted. We can see that within the pod's template there's a label that matches the deployment's label. It's the same label that appears under the selector key above. They MUST match! Just as there's a key in the root called spec, the template key itself also has contains a key named as spec. Inside this inner spec key of the template, we specify which containers we want to create in this pod. That's why it has a containers key. We see that there is just a single container under spec. Inside the containers key, we see a name key - that's already been filled, an image - which needs to be filled, and a ports key - which we need to modify and specify which ports we'd like to open. As you can see, the ports key is a list, meaning you could expose more than 1 port if you desire. Also there's a resources key aligned alongside them, a key which has been filled automatically. Under resources we see a limits key which specifies memory and cpu limits. The values were filled automatically to the default values.Kubernetes has a great documentation on how to create all sorts of resources, like deployments, replicaSets, StatefulSets, pods, and many more. Here's the link, you should check it out: https://kubernetes.io/docs/reference/kubernetes-api/
-
Let's now apply this configuration file. Open up a terminal in the same folder as the yaml config file, and run the command:
kubectl apply -f deployment.yaml
The response should look like:
deployment.apps/<name-of-deployment> created
And that's it! Simple as that.
To check that you now actually have a deployment up and running, run:
kubectl get deployments
kubectl get pods
And now begs the question: how can we scale this deployment?
The answer is: Very easily! By simply modifying our config file.
Under the spec key, located in the root of the yaml file, add another key called replicas. Give it a numeric value, like 3 or 5. Notice that when we're not specifying a replicas key, kubernetes assumes that its value defaults to 1. After making the desired changes in the yaml file, you simply need to run the kubectl apply command once again, and that's it, your changes would override any previous ones.
• C. Service Configuration
• How to Create a Service Using the Declarative Way
Let's create a service using the declarative approach.
Create a new file and name it as service.yaml.
At the top of it, start typing the word deploy, and the kubernetes extension would kick in, and you should see an auto-completion suggestion. By hitting enter, you should see the that the extension filled in quite a bit of boiler-plate for you automatically.
A configuration template yaml for creating a Service should look like:
apiVersion: v1
kind: Service
metadata:
  name: myapp
spec:
  selector:
    app: myapp
  ports:
  - port: <Port>
    targetPort: <Target Port>
There are a few things to notice in this yaml config:
-
The
kindkey has the value of Service, whereas for thedeploymentthekind's value was Deployment. -
The
apiVersionkey has the value of "v1", whereas for thedeploymenttheapiVersion's value was "apps/v1". -
metadataname is "myapp". -
spec.selectoris "myapp". -
Both
spec.ports.port&spec.ports.targetPortneed to be filled manually. ThetargetPortis the port number on the container which you'd like to expose out to thepod, andportis the port number on thepodwhich you would like to expose out to theservice. -
typekey is missing! If you recall, we discussed types like ClusterIP, NodePort, and LoadBalancer. If thetypekey isn't mentioned, then by default, kubernetes will assume the type is ClusterIP. If you want to be more explicit, you can add a key ofspec.typeand give it either one of the following values: ExternalName, ClusterIP (default), NodePort, and LoadBalancer.
Question: We only specified a port which is the pod's port (--port), and a target-port which is the container's port (--target-port). But what about the node's port??
Answer: kubernetes would auto-generated some random port! Typically a super high number. For example, if you provide --port=3000 and --target-port=80, kubernetes would add: node:32142 --> pod:3000 --> container:80
Then, to access your application, you need the node's ip address, which you could get by:
minikube ip
Don't forget that in minikube you have a cluster with only 1 node, so this ip is the ip of the only single node you own. Then, simply go to your web browser, and type:
<minikube's-ip>:<the-auto-generated-port>
And you should see a response coming back from one you’re the pods inside the exposed deployment! Pretty cool, huh? You could also use the built-in minikube's command:
minikube service <service-name>
which opens up a web service with the url of node, including the right port, without even check for the port up front. You could also use the flag --url to only get back the url address for that service:
minikube service <service-name> --url
Let's now apply this configuration file. Open up a terminal in the same folder as the yaml config file, and run the command:
kubectl apply -f service.yaml
Very simple. Very straight forward.
Deleting a Service/Deployment
To delete either a service or a deployment, using the declarative way, you simply need to run the kubectl delete command with the -f flag pointing to the yaml file/s:
kubectl delete -f service.yaml -f deployment.yaml
You get a response for any resource that kubernetes was able to delete:
deployment.apps "<name-of-deployment>" deleted
service "<name-of-service>" deleted
8. Minikube Playground - Getting Started
• Step 1: Create a minikube cluster
Before starting a minikube cluster, let's first check the current status of minikube:
minikube status
You should see and output displayed like that:
Profile "minikube" not found.
We will check it again after starting our cluster. To start a minikube cluster, run the following command:
minikube start
Make sure that Docker Engine is up and running!
You should see an output appear like that:
- minikube v1.26.1 on Microsoft Windows 10 Home 10.0.19044 Build 19044
- Using the docker driver based on user configuration
- Using Docker Desktop driver with root privileges
- Starting control plane node minikube in cluster minikube
- Pulling base image ... > gcr.io/k8s-minikube/kicbase: 74.85 MiB / 386.61 MiB 19.36% 4.79 MiB p/s
If you made a mistake, like for example you chose "hyperv", but found out that windows 10 home edition doesn't have hyper-v features, you'll need to delete the minikube cluster by:
minikube delete
It should take a few minutes to start a minikube cluster, and in the end you should see a message like:
- Done! kubectl is now configured to use "minikube" cluster and "default" namespace by default
As well as a docker container called "minikube" in a running state.
docker ps
The sentence above, saying "kubectl is now configured to use "minikube" cluster" is important, because it means that you don't need to do anything in order to connect from kubectl to the actual minikube cluster. The connection was already created for you automatically during the creation of the minikube cluster. You don't need to do stuff like attach a context with kubectl config use-context context-name.
Let's now run again the minikube status command, and see what it prints out:
minikube status
you should see an output look like:
minikube
type: Control Plane
host: Running
kubelet: Running
apiserver: Running
kubeconfig: Configured
So we're seeing that the host is running, the kubelet is running, the api-server is running, and that the kubeconfig is configured. This is how a normal status of the minikube cluster should look like. Basically, now we are actually able to create pods, deployments, services, etc, inside of this minikube cluster.
• Step 2: connecting to your minikube cluster
This next command, minikube ip, is mainly for the purpose of connecting with the cluster. This is like an ssh on a virtual machine, which allows you to run commands directly on it.
minikube ip
should result in something like:
192.168.49.2
This command helps you see which IP address was assigned to the virtual machine, or the docker container, which is running our kubernetes node, which was created by minikube.
This machine, this node, is the one running the kubernetes node.
Not very useful, but you can ssh into that machine. Minikube offers a built-in internal ssh command:
minikube ssh
which after that, you'll see:
docker@minikube:~$
Don't be fooled by the "docker" word. Minikube simply creates a default username called "docker", with a default password of "tcuser".
- Username: docker
- Password: tcuser
A second way to connect with your minikube cluster is by using docker exec::
docker exec -it <minikube-container-id> /bin/bash
We are now inside the kubernetes node.
• Step 3: check containers within your node
First command I'd like you to run inside the VM is a docker one:
docker ps
In my case, running this command I saw around 14 running containers.
If you look closely at the names, you'll see some familiar ones:
k8s_POD_kube-apiserver
k8s_POD_kube-scheduler
k8s_kube-proxy_kube-proxy
k8s_POD_kube-controller-manager
k8s_coredns_coredns
k8s_etcd_etcd
As mentioned in an earlier part of this guide, we much rather be using kubectl to manage our kubernetes cluster remotely, from our own local terminal. This means that we don't actually need to connect to our minikube environment via ssh and be inside of it, but rather, we'd use the kubectl and control it from outside.
That's it for minikube! This part is basically done. From this point onwards, it's kubectl's job to manipulate the cluster, add pods, removed pods, create deployments, and many more. Minikube's role is over. We only needed it in order to create a cluster, and have a live environment running all our pods, deployments, services, etc.
• Step 4: check the cluster's info
The first command we'd run is:
kubectl cluster-info
You should see the following output printed:
Kubernetes control plane is running at https://127.0.0.1:54341
CoreDNS is running at https://127.0.0.1:54341/api/v1/namespaces/kube-system/services/kube-dns:dns/proxy
To further debug and diagnose cluster problems, use 'kubectl cluster-info dump':
kubectl cluster-info dump
The response on that command is too crazy to paste here. It's a long logs report.
• Step 5: get nodes
But first, let's list nodes which are available in our kubernetes cluster. Run the following command:
kubectl get nodes
Running this locally with minikube you would probably see only one node as the output:
NAME      STATUS    ROLES           AGE   VERSION
minikube  Ready     control-plane   41m   v1.24.3
This single node acts as both the master node as well as the worker node. On the worker node, kubernetes creates different pods related to your deployments.
• Step 6: get pods & namespaces
Now let's check how many pods are available right now in our cluster:
kubectl get pods
This would print out:
No resources found in default namespace.
By default, it lists all the pods inside the default namespace, but we haven't created any pods so far! That's why we got nothing back. But if we look inside a different namespace, we would see some interesting stuff.
So first, let's list all the namespaces, to learn which namespaces are even available to us in this kubernetes cluster:
kubectl get namespaces
This would print out:
NAME STATUS AGE
default Active 48m
kube-node-lease Active 48m
kube-public Active 48m
kube-system Active 48m
We see that we have 4 namespaces: default, kube-node-lease, kube-public, and kube-system. Namespaces are used in kubernetes in order to group different resources and configuration objects.
Let's now check what pods are running in the kube-system namespace:
kubectl get pods --namespace=kube-system
This got me back the result:
NAME READY STATUS RESTARTS AGE
coredns-6d4b75cb6d-jz8r9 1/1 Running 0 54m
etcd-minikube 1/1 Running 0 54m
kube-apiserver-minikube 1/1 Running 0 54m
kube-controller-manager-minikube 1/1 Running 0 54m
kube-proxy-g75dw 1/1 Running 0 54m
kube-scheduler-minikube 1/1 Running 0 54m
storage-provisioner 1/1 Running 1 (54m ago) 54m

---

Normal Scheduled 20m default-scheduler Successfully assigned default/nginx to minikube
Normal Pulling 20m kubelet Pulling image "nginx"
Normal Pulled 20m kubelet Successfully pulled image "nginx" in 16.2956785s
Normal Created 20m kubelet Created container nginx
Normal Started 20m kubelet Started container nginx
All those pods returned are system pods, which are running on this master node.
• Step 7: manually create a pod
Alright! Now let's go ahead and create a pod manually.
kubectl has a kubectl run command, which is very similar to the docker run command. Just as with the docker run command you can create a single docker container, with the kubectl run command you can create a single pod.
The general form of the command is:
kubectl run <pod-name> --image=IMAGE_NAME
Let's, for instance, use nginx as our docker image from docker hub:
kubectl run nginx --image=nginx
Note that I named the pod exactly like the image, but I certainly didn't have to.
Under the --image flag though, the image name must be a valid image from the docker registry.
Running the above command, an nginx docker image will automatically be pulled, and a new container will be created based on this image, and this container will be running inside of our kubernetes pod.
After running the command you should see the following message:
pod/nginx created
let's now enter the command:
kubectl get pods
And you should see a response like:
NAME READY STATUS RESTARTS AGE
nginx 0/1 ContainerCreating 0 61s
So you can see that a single pod has been created, but it's not ready yet, and its status is "ContainerCreating". If you ran the command a few seconds later, you should see this response:
NAME READY STATUS RESTARTS AGE
nginx 1/1 Running 0 61s
Now it's ready! and it's in a good "running" state.
Let's now get some details about this specific pod, which name we chose as "nginx".
For getting details on a specific node, run the command:
kubectl describe pod nginx
You should see a pretty long response:
Name: nginx
Namespace: default
Priority: 0
Service Account: default
Node: minikube/192.168.49.2
Start Time: Wed, 14 Sep 2022 22:46:07 +0300
Labels: run=nginx
Annotations: <none>
Status: Running
IP: 172.17.0.3
IPs:
  IP: 172.17.0.3
Containers:
  nginx:
    Container ID: docker://ddfde4190e818807339700c2b996c8e8eb6c72378a4f7a913cf478c9dd32450b
    Image: nginx
    Image ID: docker-pullable://nginx@sha256:0b970013351304af46f322da1263516b188318682b2ab1091862497591189ff1
    Port: <none>
    Host Port: <none>
    State: Running
      Started: Wed, 14 Sep 2022 22:46:25 +0300
    Ready: True
    Restart Count: 0
    Environment: <none>
    Mounts:
/var/run/secrets/kubernetes.io/serviceaccount from kube-api-access-vxrs4 (ro)
Conditions:
    Type Status
    Initialized True
    Ready True
    ContainersReady True
    PodScheduled True
Volumes:
    kube-api-access-vxrs4:
      Type: Projected (a volume that contains injected data from multiple sources)
      TokenExpirationSeconds: 3607
      ConfigMapName: kube-root-ca.crt
      ConfigMapOptional: <nil>
      DownwardAPI: true
QoS Class: BestEffort
Node-Selectors: <none>
Tolerations: node.kubernetes.io/not-ready:NoExecute op=Exists for 300s
             node.kubernetes.io/unreachable:NoExecute op=Exists for 300s
Events:
  Type    Reason     Age   From               Message
  ----    ------     ---   ----               -------
  Normal  Scheduled  30s   default-scheduler  Successfully assigned default/nginx to minikube
  Normal  Pulling    29s   kubelet            Pulling image "nginx"
  Normal  Pulled     28s   kubelet            Successfully pulled image "nginx" in 1.578s (1.578s including waiting)
  Normal  Created    28s   kubelet            Created container nginx
  Normal  Started    28s   kubelet            Started container nginx
Some really useful information is:
-
name: name of the pod
-
namespace: the namespace it belongs to (automatically assigned to default).
-
Start time: the start time of the pod.
-
Status: the status of the pod (running, stopped, etc.)
-
IP: the IP address which was assigned to this specific pod. Note that this is an internal IP address! You will not be able to connect to it from outside! In order to be able to connect to pods, you have to create services in kubernetes. We'll see that a bit later. Containers & Container ID: Containers hold a list of all docker containers which are running inside of our pod. An item on that list would have a container ID, which is the container ID that was generated/given to it.
-
Controlled By: this field is related to a subject called deployment - where many identical pods are considered as one collection, and so with this field we could see who controls all those identical pods. This fields basically says: "I belong to this deployment". The value here looks something like:
ReplicaSet/DEPLOYMENT_NAME-<replicaSet-hash> -
Image: which image was utilized for this particular container. That's the image which was specified using the --image flag upon creation of the pod.
-
Events: in the events section you can see a message saying the pod was successfully assigned to minikube node, a message about the image which was pulled, creation of the container, and starting of tat container.
There were actually two containers being ran! If you connect to your minikube again with:
minikube ssh
and in there run the command:
docker ps | grep nginx
You'll see two running containers:
ddfde nginx "/docker-entrypoint.…" 37 min ago Up 37 min k8s_nginx_nginx_default_0b6bb6
60a2b k8s.gcr.io/pause:3.6 "/pause" 38 min ago Up 38 min k8s_POD_nginx_default_0b6bb695
Both are related to nginx.
First one is named: k8s_nginx_nginx...
And the second one is named: k8s_POD_nginx...
The second one is also known as "pause container".
You can actually see, that the first one ran the script "/docker-entrypoint", and that the second one launched a script named "/pause".
The point to take from here is that if docker is chosen as the container runtime in kubernetes, there are always such "pause containers" that are created for each specific pod. Those pause containers are created in order to, let's say, lock the namespace of a specific pod. If you recall, we previously discussed how all containers inside of the same pod actually share the same namespace.
So what's basically happening here?
The first container of nginx, it could be stopped, could be recreated by kubernetes, but the pod remains untouched. And this second container, which is called "pause container", is required to lock/keep the namespace of the pod.
• Step 8: connect to a specific container
Alright, let's now see how we can connect to an internal container running inside of our minikube pod. In our case, let's connect to the container running our nginx server. In order to connect to a container, you could use either the id of the image, or the name of the image. You can get the id same as we did above:
docker ps
Grab the id, and then do:
docker exec -it <image-id> sh
Note that this is a docker command (and you should recognize it).
You notice that you're inside the container when the terminal suddenly appears as such:
> _
Inside the bash you can run several useful commands, such as:
hostname
and get back as a response:
nginx
which is actually the name of the pod.
And you can even get the IP address of this container:
hostname -i
And get back as a response:
172.17.0.3
Now let's try to send a request to the server which is running inside of this container where we are currently in, by using curl and the above ip address:
curl 172.17.0.3
This should spit out the famous "Welcome to nginx!" html which is being returned when you hit the nginx gateway. This is simply to say that nginx is up and running. Now, by typing the command:
exit
You get out of the nginx container, but you're are still inside the pod running that container. Let's exit from this connection as well:
exit
Now let's run the command:
Kubectl get pod -o wide
You should get back the response:
NAME READY STATUS RESTARTS AGE IP NODE NOMINATED NODE READINESS GATES
nginx 1/1 Running 0 62m 172.17.0.3 minikube <none> <none>
With that command you can also get back the IP address of a particular pod. Here we can see the same IP address we saw earlier inside the container. If there are several containers inside the pod, they will all share that same IP address.
Alright! So we've just created our first pod in our kubernetes cluster, and we also explored getting some details about that pod.
Before moving forward, let's first delete the pod we created earlier. To delete a pod, use this command:
kubectl delete pod POD_NAME
So in our case:
kubectl delete pod nginx
You should get back the following response saying:
pod nginx deleted
After that the pod will be gone! All volumes, all namespaces related to this particular pod will be removed.
• Step 9: create a deployment
We've talked about how creating pods using the kubectl run command is not very practical, and that you should always aim to create deployments. A deployment will be responsible for the creation of the pods. All pods inside a deployment are exactly the same! A deployment is meant for creating multiple copies of the same pod to distribute load across different nodes within the kubernetes cluster. That's the whole purpose of the deployment.
Now let's go ahead and create a deployment, with the same image we used before - nginx.
We will begin by giving only one copy at first, to sort of replay what we did earlier with the kubectl run command, and after that we'll examine a deployment with multiple copies, and also we'll create a service for this deployment, in order to be able to connect to our deployment from the outside world. Let's go ahead and create a deployment.
To create a deployment, run the following command:
kubectl create deployment DEPLOYMENT_NAME --image=IMAGE_NAME
Let's create an example deployment called:
kubectl create deployment nginx-deployment --image=nginx
The response should appear as:
deployment.apps/nginx-deployment created
Next, let's get all deployments with the command:
kubectl get deployments
The response we'd get back is:
NAME                READY   UP-TO-DATE  AVAILABLE   AGE
nginx-deployment    1/1   1             1           2m35s
Here we see our single deployment, which is ready and up-to-date.
Now let's run the command "get pods":
kubectl get pods
The response back should be something like this:
NAME READY STATUS RESTARTS AGE
nginx 1/1 Running 1 (6m29s ago) 24h
nginx-deployment-85c6 1/1 Running 0 5m3s
We see that there is now a single pod, which is managed by this particular deployment. The pod was created automatically, as a result of us creating the deployment. Right now we only have the 1 pod in our deployment, but we now have the option to scale, and increase the quantity of the pods.
Before we do that, let's first read some details about the deployment:
kubectl describe deployment DEPLOYMENT_NAME
So in our case, it's:
kubectl describe deployment nginx-deployment
And we should get back a response like this:
Name: nginx-deployment
Namespace: default
CreationTimestamp: Thu, 15 Sep 2022 23:33:18 +0300
Labels: app=nginx-deployment
Annotations: deployment.kubernetes.io/revision: 1
Selector: app=nginx-deployment
Replicas: 1 desired | 1 updated | 1 total | 1 available | 0 unavailable
StrategyType: RollingUpdate
MinReadySeconds: 0
RollingUpdateStrategy: 25% max unavailable, 25% max surge
Pod Template:
Labels: app=nginx-deployment
Containers:
nginx:
Image: nginx
Port: <none>
Host Port: <none>
Environment: <none>
Mounts: <none>
Volumes: <none>
Conditions:
Type Status Reason

---

Available True MinimumReplicasAvailable
Progressing True NewReplicaSetAvailable
OldReplicaSets: <none>
NewReplicaSet: nginx-deployment-85c6d5f6dd (1/1 replicas created)
Events:
Type Reason Age From Message

---

Normal ScalingReplicaSet 11m deployment-controller Scaled up replica set nginx-deployment-85c6d5f6dd to 1
If you scroll up, you could see above the following information:
-
Name of the deployment: A name which was given by the developer. The namespace where such deployment was created. In our case - default namespace.
-
Label: Notice that kubernetes automatically assigned labels to this particular deployment, and there's just a single label: app=nginx-deployment
-
Annotations: Created automatically.
-
Selectors: Selectors are used in order to connect pods with deployment, because in kubernetes, pod & deployment are actually separate objects, and we have to know how to assign specific pods to particular deployments. Here, in our case, we see a
-
selector: app=nginx-deployment. For this particular pod, which was automatically created and assigned to this deployment, we will find a label with the same value of "app=nginx-deployment".
-
Replicas: here you could find information about the number of the pods which are desired by this deployment, and number of pods which are currently running. In our case we only have a single pod, i.e. a single replica, which is desired, 1 updated, 1 in total, and 1 available. It means that now there is 1 pod which is assigned to this deployment.
-
StrategyType: Here we see the value "RollingUpdate". This field tells how to perform updated of deployments. We will get back to it a bit later in this course.
-
Pod Template: notice the corresponding label here, which is "app=nginx-deployment", the same label that is mentioned in the label field. As I've mentioned, that's how the deployment is connected to the particular pods. Events: events related to this particular deployment. Here in our case, we can see a single event called "ScalingReplicaSet". But what is a Replica Set? A bit above the event field you see a field called "NewReplicaSet".
-
NewReplicaSet: a replica set actually manages all pods related to deployment, and a replica set is a set of replicas of your application, because you could create 5, 10, 100 different pods in the same deployment, and all of them are included in the replica set. In our case we see
nginx-deployment-<some-id>. And that why we see here under events, such replica with a message saying "scaled up to 1", meaning 1 pod. One pod was created in this replica set.
Alright, so that's it for the details about our deployment.
Notice that when we ran the command kubectl get pods we saw the name for the pod inside the deployment. If you look closely at its name, you'll see that it's a string that starts with the name of the replica set, which we just discussed, and then it ends with a hash that's unique to this specific pod. If there were multiple pods in the same deployment, you'll see the same hash prefix for the replica set part, but a different pod hash at the end that states "this is a different pod".
• Step 10: scale a deployment
○ Scale up
Now let's try to scale this deployment, and increase the number of pods living inside our deployment. Currently, it only holds a single pod. let's make it 2, or even 3.
For that we can use the scale command:
kubectl scale deployment DEPLOYMENT_NAME --replicas=#number
let's try this out on our nginx-deployment deployment:
deployment.apps/nginx-deployment scaledWe should get back a message saying:
deployment.apps/nginx-deployment scaled
Alright! Let's check that it worked!
Let's run the get pods command and see what we get:
kubectl get pods
And here's the output:
NAME READY STATUS RESTARTS AGE
nginx 1/1 Running 1 (11h ago) 35h
nginx-deployment-85c6d5f6dd-j4ld4 0/1 Creating 0 95s
nginx-deployment-85c6d5f6dd-nvfqx 0/1 Creating 0 95s
nginx-deployment-85c6d5f6dd-qmxj7 0/1 Creating 0 95s
nginx-deployment-85c6d5f6dd-rvz4k 1/1 Running 0 11h
nginx-deployment-85c6d5f6dd-xtwvw 0/1 Creating 0 95s
From the output above we gather that there are 4 new containers, which are currently being created. If we wait long enough and ran the command again, we're bound to see:
NAME READY STATUS RESTARTS AGE
nginx 1/1 Running 1 (11h ago) 35h
nginx-deployment-85c6d5f6dd-j4ld4 1/1 Running 0 95s
nginx-deployment-85c6d5f6dd-nvfqx 1/1 Running 0 95s
nginx-deployment-85c6d5f6dd-qmxj7 1/1 Running 0 95s
nginx-deployment-85c6d5f6dd-rvz4k 1/1 Running 0 11h
nginx-deployment-85c6d5f6dd-xtwvw 1/1 Running 0 95s
We just scaled our deployment to 5 different replicas. That are 5 different pods running right now inside of our kubernetes cluster. Notice how easy it is? We did not create those pod manually, kubernetes scaled this deployment automatically for us. Also notice how all those new pods have the same prefix, which is the name of the replicaSet, and how each pod has its own hash at the end.
I want to print it in another way now, one that shows the IP address of each pod. Remember we saw a command that does this? It's the same get pods command, only with the -o wide addition:
kubectl get pods -o wide
NAME READY STATUS AGE IP NODE NOMINATED NODE READINESS
nginx 1/1 Running 36h 172.17.0.3 minikube <none> <none>
nginx-deployment-85c6d5f6dd-j4ld4 1/1 Running 11m 172.17.0.8 minikube <none> <none>
nginx-deployment-85c6d5f6dd-nvfqx 1/1 Running 11m 172.17.0.6 minikube <none> <none>
nginx-deployment-85c6d5f6dd-qmxj7 1/1 Running 11m 172.17.0.5 minikube <none> <none>
nginx-deployment-85c6d5f6dd-rvz4k 1/1 Running 11h 172.17.0.4 minikube <none> <none>
nginx-deployment-85c6d5f6dd-xtwvw 1/1 Running 11m 172.17.0.7 minikube <none> <none>
And this lets us see how each pod has a different IP address.
○ Scale Down
We just saw how we can scale up from 1 pod to 2+ pods, but it was all actually a part of the kubernetes scaling up mechanism. When you're scaling up with kubectl, you are creating more pods, meaning more pods would be added, and go through a CreatingContainer stage. However, if you scale down, from let's say 5 to 2, then 3 pods would simply be removed, and you'd be left with 2 out of the 5 pods in a running state. No new pods need to be created! How cool is that?! And of course - efficient.