Minikube
1. Minikube Commands
A minikube cluster consists of 1 node, that serves both as the master node & the worker node, looks like that:
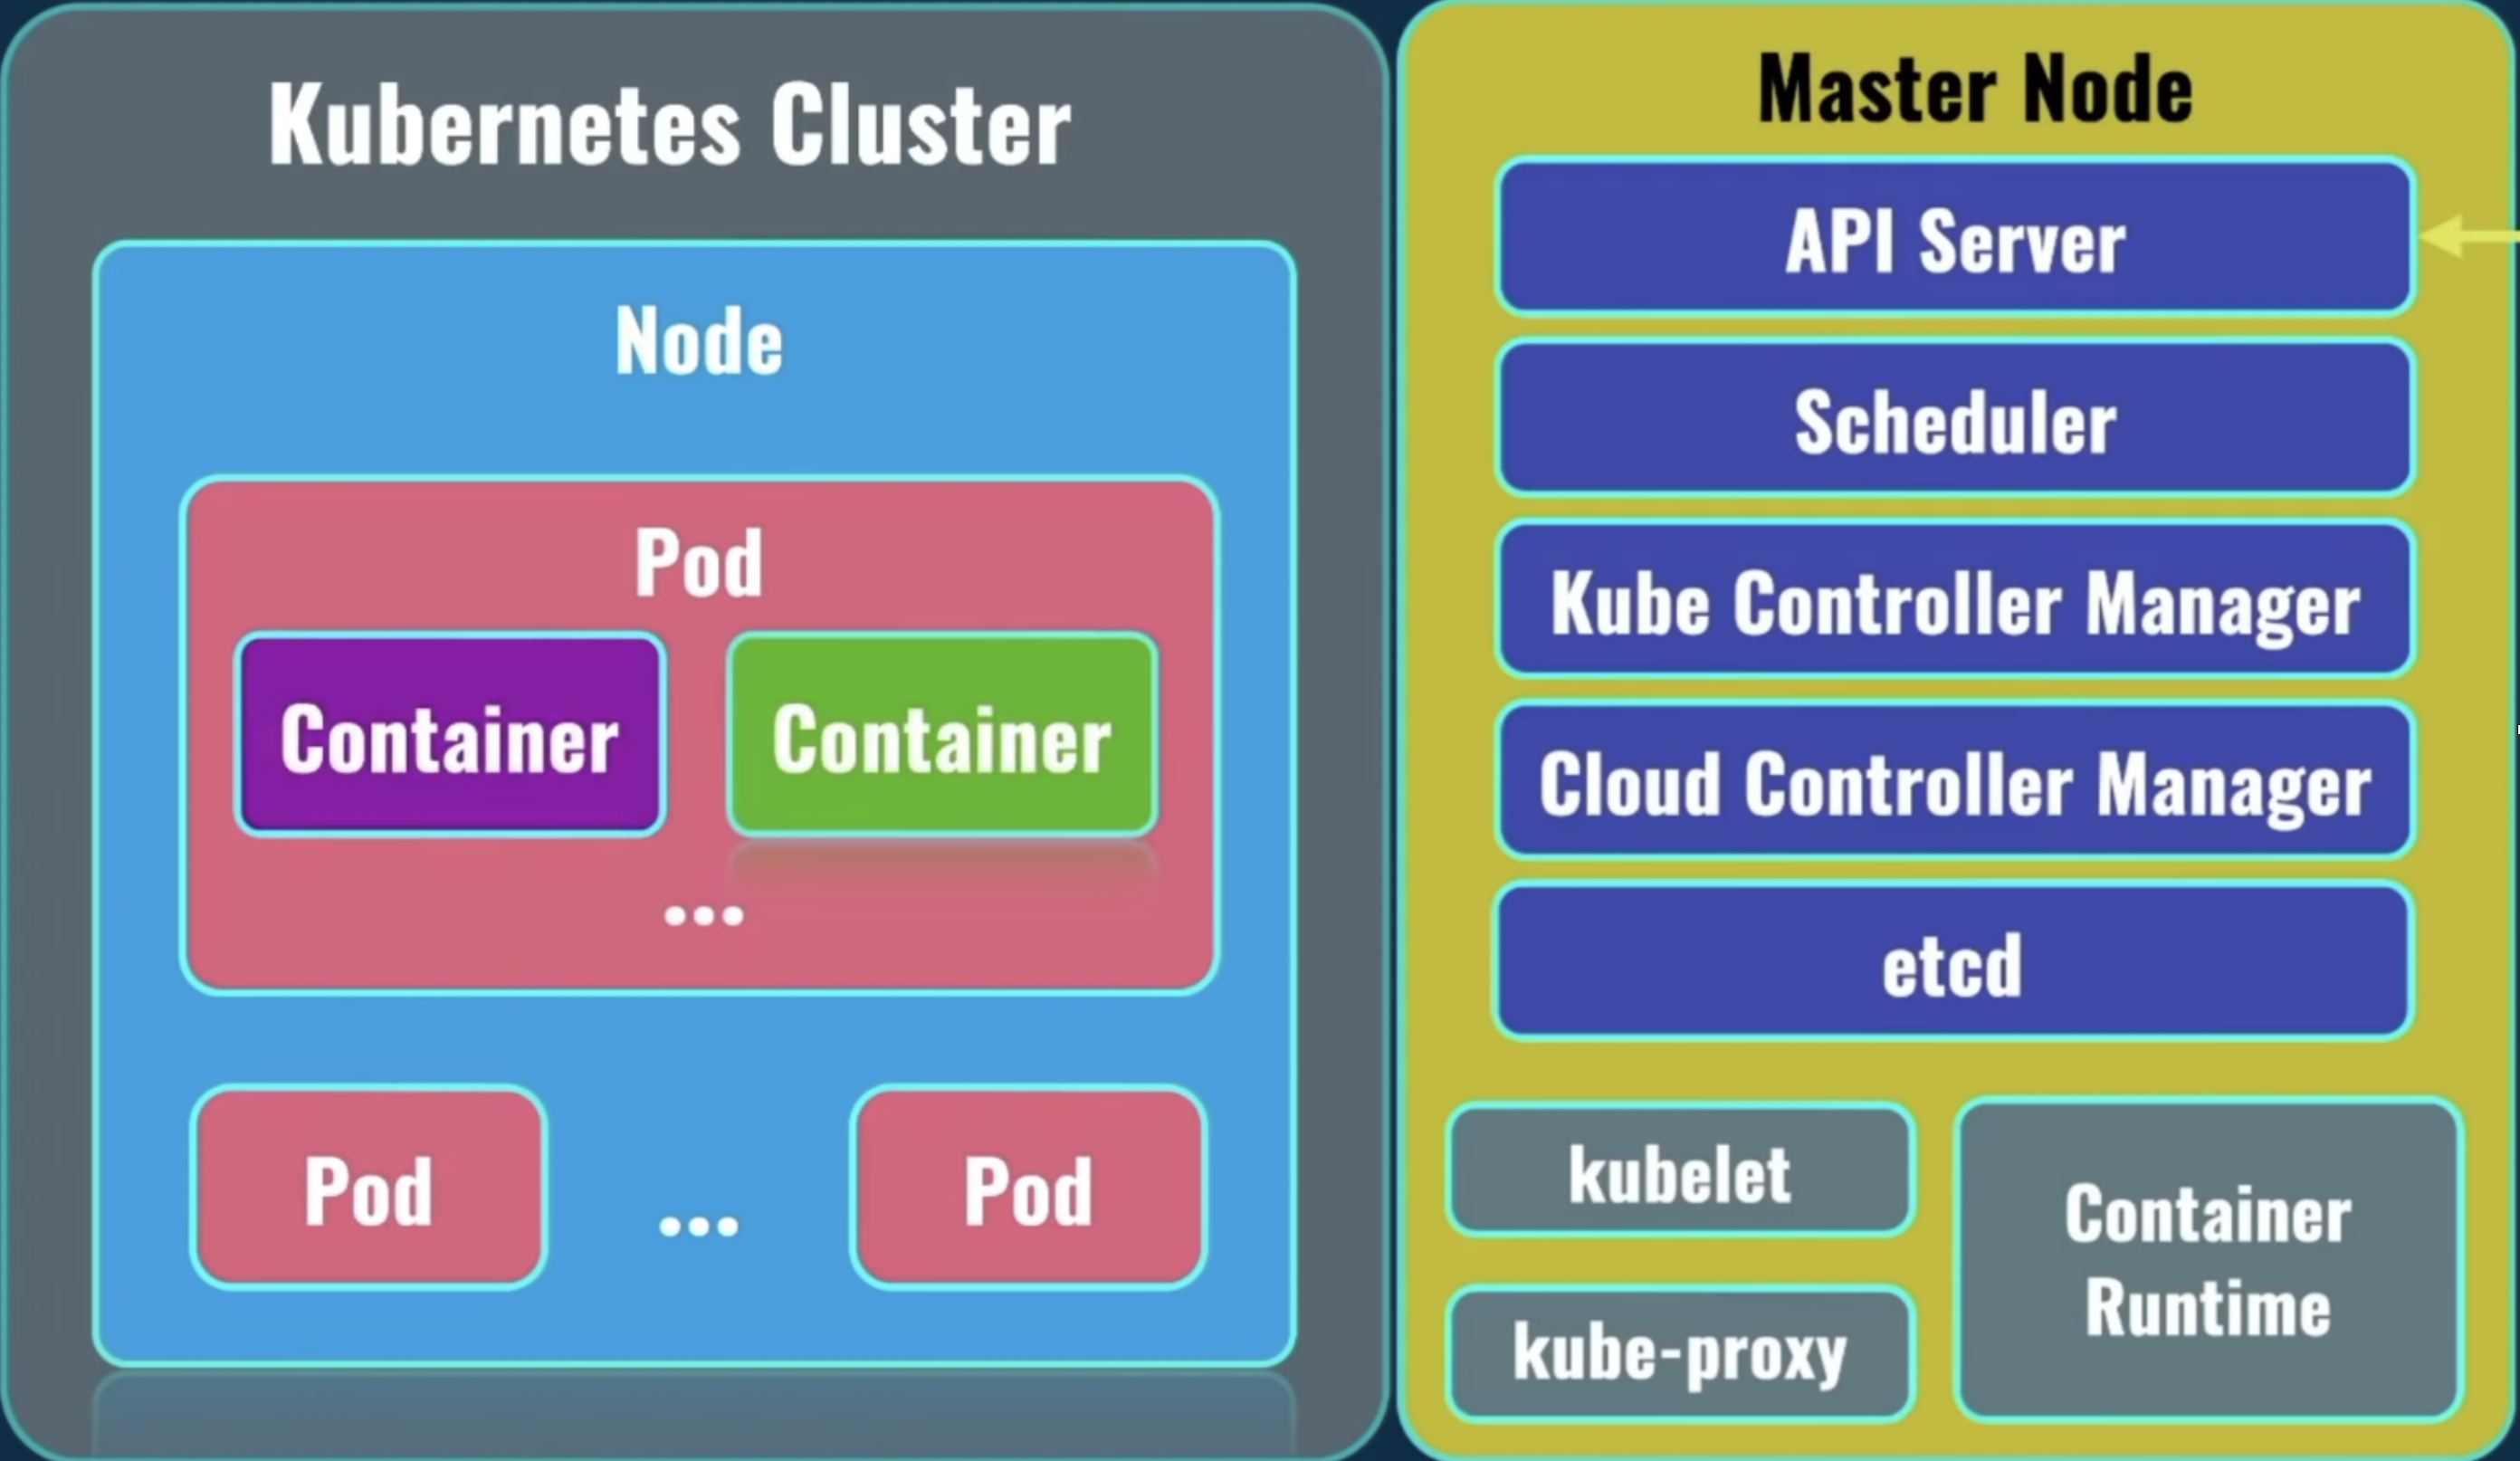
On the left, you can see at the top level the Kubernetes Cluster. Under the Kubernetes Cluster, there could be 1 or more nodes (servers). Minikube used to have only 1 (it can now have more). Under the Node, there could be 1 or more pods. Under the pod, there could be 1 or more containers. Usually? A pod holds only 1 container.
When creating a minikube cluster for the first time, by default, it's created with:
- 1 kubernetes cluster
- 1 node (that acts like both the master & worker node)
- 1 pod
- Command 1: minikube delete
The command:
minikube delete
Description:
Deletes a local Kubernetes cluster. This command deletes the VM, and removes all associated files.
- Command 2: minikube profile list
The command:
minikube profile list
Description:
Lists all minikube profiles. Lists all valid minikube profiles and detects all possible invalid profiles.
A response example would look like:
- Deleting "minikube" in docker ...
- Deleting container "minikube" ...
- Removing C:\Users\tal\.minikube\machines\minikube ...
- Removed all traces of the "minikube" cluster.
- Command 3: minikube profile
The command:
Set profile as default:
minikube profile profile_name
Get current profile:
minikube profile
Description:
profile sets the current minikube profile, or gets the current profile if no arguments are provided. This is used to run and manage multiple minikube instances. You can return to the default minikube profile by running minikube profile default
- Command 4: minikube start
The command:
If it's your 1st time running this command:
- Option 1: start a cluster using the docker driver
minikube start --driver=docker --profile profile_name
- Option 2: make docker the default driver, then you could use short:
minikube start
minikube config set driver docker
minikube start
If it's your 2nd+ time running this command:
minikube start
Description:
Starts a kubernetes cluster locally on your machine.
For this command to work, your machine's Docker Engine needs to be running. It should take a few minutes to start a minikube cluster. That cluster has only 1 node, which acts as both the master node & the worker node.
The cluster is created with a default profile called minikube, which you could override using the --profile (-p) flag:
minikube start --profile prod
A response example would look like:
- minikube v1.26.1 on Microsoft Windows 10 Home 10.0.19044 Build 19044
- Using the docker driver based on user configuration
- Using Docker Desktop driver with root privileges
- Starting control plane node minikube in cluster minikube
- Pulling base image ...
  > gcr.io/k8s-minikube/kicbase: 74.85 MiB / 386.61 MiB 19.36% 4.79 MiB p/s
- Command 5: minikube stop
The command:
minikube stop
Description:
Stops a running local Kubernetes cluster.
Stops a local Kubernetes cluster. This command stops the underlying VM or container, but keeps user data intact. The cluster can be started again with the "start" command.
A response example would look like:
- minikube v1.26.1 on Microsoft Windows 10 Home 10.0.19044 Build 19044
- Using the docker driver based on user configuration
- Using Docker Desktop driver with root privileges
- Starting control plane node minikube in cluster minikube
- Pulling base image ...
  > gcr.io/k8s-minikube/kicbase: 74.85 MiB / 386.61 MiB 19.36% 4.79 MiB p/s
- Command 6: minikube status
The command:
minikube status --profile profile_name
Description:
Shows the status of your kubernetes cluster.
A response example would look like:
A good response would look like:
minikube
type: Control Plane
host: Running
kubelet: Running
apiserver: Running
kubeconfig: Configured
If a cluster does not exist, the response would appear as such:
Profile "minikube" not found.
- Command 7: minikube ip
minikube ip --node node_name --profile profile_name
Description:
Returns the IP address of the specified node.
Commonly used options:
-
Flag 1: -n | --node
By default, it returns the ip of the node which is considered as the primary control plane. To get the ip of some other node, use the-n,--nodeflag followed by its name.minikube ip --node luckylove
- Command 8: minikube node list
minikube node list
Description:
Returns a list of all nodes inside the minikube cluster.
A response example would look like:
minikube 192.168.49.2
- Command 9: minikube ssh
minikube ssh --node node_name --profile profile_name
Description:
A way to connect to your minikube environment (for debugging).
With this command you don't even need to enter a password! So it's much more comfortable.
A response example would look like:
docker@minikube:~$
We can learn from the output above that when we ran minikube start to create the cluster, minikube by default created a username called "docker", with a default password of "tcuser".
- Username: docker
- Password: tcuser
- Command 10: minikube service
minikube service -n <namespace> name_of_service
Description:
In case of a NodePort type, opens up a web browser with the kubernetes URL for the service running in your local cluster.
- A. The --url flag:
Use the flag --url, to display the Kubernetes service URL in the CLI instead of opening it in the default browser.
- B. The --all flag:
Forwards all services in a namespace (defaults to "false").
- Command 11: minikube tunnel
minikube tunnel
Description:
2. Minikube Playground - Getting Started
• Step 1: Create a minikube cluster
Before starting a minikube cluster, let's first check the current status of minikube:
minikube status
You should see and output displayed like that:
Profile "minikube" not found.
We will check it again after starting our cluster. To start a minikube cluster, run the following command:
minikube start
Make sure that Docker Engine is up and running!
You should see an output appear like that:
- minikube v1.26.1 on Microsoft Windows 10 Home 10.0.19044 Build 19044
- Using the docker driver based on user configuration
- Using Docker Desktop driver with root privileges
- Starting control plane node minikube in cluster minikube
- Pulling base image ... > gcr.io/k8s-minikube/kicbase: 74.85 MiB / 386.61 MiB 19.36% 4.79 MiB p/s
If you made a mistake, like for example you chose "hyperv", but found out that windows 10 home edition doesn't have hyper-v features, you'll need to delete the minikube cluster by:
minikube delete
It should take a few minutes to start a minikube cluster, and in the end you should see a message like:
- Done! kubectl is now configured to use "minikube" cluster and "default" namespace by default
As well as a docker container called "minikube" in a running state.
docker ps
The sentence above, saying "kubectl is now configured to use "minikube" cluster" is important, because it means that you don't need to do anything in order to connect from kubectl to the actual minikube cluster. The connection was already created for you automatically during the creation of the minikube cluster. You don't need to do stuff like attach a context with kubectl config use-context context-name.
Let's now run again the minikube status command, and see what it prints out:
minikube status
you should see an output look like:
minikube
type: Control Plane
host: Running
kubelet: Running
apiserver: Running
kubeconfig: Configured
So we're seeing that the host is running, the kubelet is running, the api-server is running, and that the kubeconfig is configured. This is how a normal status of the minikube cluster should look like. Basically, now we are actually able to create pods, deployments, services, etc, inside of this minikube cluster.
• Step 2: connecting to your minikube cluster
This next command, minikube ip, is mainly for the purpose of connecting with the cluster. This is like an ssh on a virtual machine, which allows you to run commands directly on it.
minikube ip
should result in something like:
192.168.49.2
This command helps you see which IP address was assigned to the virtual machine, or the docker container, which is running our kubernetes node, which was created by minikube.
This machine, this node, is the one running the kubernetes node.
Not very useful, but you can ssh into that machine. Minikube offers a built-in internal ssh command:
minikube ssh
which after that, you'll see:
docker@minikube:~$
Don't be fooled by the "docker" word. Minikube simply creates a default username called "docker", with a default password of "tcuser".
- Username: docker
- Password: tcuser
A second way to connect with your minikube cluster is by using docker exec::
docker exec -it <minikube-container-id> /bin/bash
We are now inside the kubernetes node.
• Step 3: check containers within your node
First command I'd like you to run inside the VM is a docker one:
docker ps
In my case, running this command I saw around 14 running containers.
If you look closely at the names, you'll see some familiar ones:
k8s_POD_kube-apiserver
k8s_POD_kube-scheduler
k8s_kube-proxy_kube-proxy
k8s_POD_kube-controller-manager
k8s_coredns_coredns
k8s_etcd_etcd
As mentioned in an earlier part of this guide, we much rather be using kubectl to manage our kubernetes cluster remotely, from our own local terminal. This means that we don't actually need to connect to our minikube environment via ssh and be inside of it, but rather, we'd use the kubectl and control it from outside.
That's it for minikube! This part is basically done. From this point onwards, it's kubectl's job to manipulate the cluster, add pods, removed pods, create deployments, and many more. Minikube's role is over. We only needed it in order to create a cluster, and have a live environment running all our pods, deployments, services, etc.
• Step 4: check the cluster's info
The first command we'd run is:
kubectl cluster-info
You should see the following output printed:
Kubernetes control plane is running at https://127.0.0.1:54341
CoreDNS is running at https://127.0.0.1:54341/api/v1/namespaces/kube-system/services/kube-dns:dns/proxy
To further debug and diagnose cluster problems, use 'kubectl cluster-info dump':
kubectl cluster-info dump
The response on that command is too crazy to paste here. It's a long logs report.
• Step 5: get nodes
But first, let's list nodes which are available in our kubernetes cluster. Run the following command:
kubectl get nodes
Running this locally with minikube you would probably see only one node as the output:
NAME      STATUS    ROLES           AGE   VERSION
minikube  Ready     control-plane   41m   v1.24.3
This single node acts as both the master node as well as the worker node. On the worker node, kubernetes creates different pods related to your deployments.
• Step 6: get pods & namespaces
Now let's check how many pods are available right now in our cluster:
kubectl get pods
This would print out:
No resources found in default namespace.
By default, it lists all the pods inside the default namespace, but we haven't created any pods so far! That's why we got nothing back. But if we look inside a different namespace, we would see some interesting stuff.
So first, let's list all the namespaces, to learn which namespaces are even available to us in this kubernetes cluster:
kubectl get namespaces
This would print out:
NAME STATUS AGE
default Active 48m
kube-node-lease Active 48m
kube-public Active 48m
kube-system Active 48m
We see that we have 4 namespaces: default, kube-node-lease, kube-public, and kube-system. Namespaces are used in kubernetes in order to group different resources and configuration objects.
Let's now check what pods are running in the kube-system namespace:
kubectl get pods --namespace=kube-system
This got me back the result:
NAME READY STATUS RESTARTS AGE
coredns-6d4b75cb6d-jz8r9 1/1 Running 0 54m
etcd-minikube 1/1 Running 0 54m
kube-apiserver-minikube 1/1 Running 0 54m
kube-controller-manager-minikube 1/1 Running 0 54m
kube-proxy-g75dw 1/1 Running 0 54m
kube-scheduler-minikube 1/1 Running 0 54m
storage-provisioner 1/1 Running 1 (54m ago) 54m

---

Normal Scheduled 20m default-scheduler Successfully assigned default/nginx to minikube
Normal Pulling 20m kubelet Pulling image "nginx"
Normal Pulled 20m kubelet Successfully pulled image "nginx" in 16.2956785s
Normal Created 20m kubelet Created container nginx
Normal Started 20m kubelet Started container nginx
All those pods returned are system pods, which are running on this master node.
• Step 7: manually create a pod
Alright! Now let's go ahead and create a pod manually.
kubectl has a kubectl run command, which is very similar to the docker run command. Just as with the docker run command you can create a single docker container, with the kubectl run command you can create a single pod.
The general form of the command is:
kubectl run <pod-name> --image=IMAGE_NAME
Let's, for instance, use nginx as our docker image from docker hub:
kubectl run nginx --image=nginx
Note that I named the pod exactly like the image, but I certainly didn't have to.
Under the --image flag though, the image name must be a valid image from the docker registry.
Running the above command, an nginx docker image will automatically be pulled, and a new container will be created based on this image, and this container will be running inside of our kubernetes pod.
After running the command you should see the following message:
pod/nginx created
let's now enter the command:
kubectl get pods
And you should see a response like:
NAME READY STATUS RESTARTS AGE
nginx 0/1 ContainerCreating 0 61s
So you can see that a single pod has been created, but it's not ready yet, and its status is "ContainerCreating". If you ran the command a few seconds later, you should see this response:
NAME READY STATUS RESTARTS AGE
nginx 1/1 Running 0 61s
Now it's ready! and it's in a good "running" state.
Let's now get some details about this specific pod, which name we chose as "nginx".
For getting details on a specific node, run the command:
kubectl describe pod nginx
You should see a pretty long response:
Name: nginx
Namespace: default
Priority: 0
Service Account: default
Node: minikube/192.168.49.2
Start Time: Wed, 14 Sep 2022 22:46:07 +0300
Labels: run=nginx
Annotations: <none>
Status: Running
IP: 172.17.0.3
IPs:
  IP: 172.17.0.3
Containers:
  nginx:
    Container ID: docker://ddfde4190e818807339700c2b996c8e8eb6c72378a4f7a913cf478c9dd32450b
    Image: nginx
    Image ID: docker-pullable://nginx@sha256:0b970013351304af46f322da1263516b188318682b2ab1091862497591189ff1
    Port: <none>
    Host Port: <none>
    State: Running
      Started: Wed, 14 Sep 2022 22:46:25 +0300
    Ready: True
    Restart Count: 0
    Environment: <none>
    Mounts:
/var/run/secrets/kubernetes.io/serviceaccount from kube-api-access-vxrs4 (ro)
Conditions:
    Type Status
    Initialized True
    Ready True
    ContainersReady True
    PodScheduled True
Volumes:
    kube-api-access-vxrs4:
      Type: Projected (a volume that contains injected data from multiple sources)
      TokenExpirationSeconds: 3607
      ConfigMapName: kube-root-ca.crt
      ConfigMapOptional: <nil>
      DownwardAPI: true
QoS Class: BestEffort
Node-Selectors: <none>
Tolerations: node.kubernetes.io/not-ready:NoExecute op=Exists for 300s
             node.kubernetes.io/unreachable:NoExecute op=Exists for 300s
Events:
  Type    Reason     Age   From               Message
  ----    ------     ---   ----               -------
  Normal  Scheduled  30s   default-scheduler  Successfully assigned default/nginx to minikube
  Normal  Pulling    29s   kubelet            Pulling image "nginx"
  Normal  Pulled     28s   kubelet            Successfully pulled image "nginx" in 1.578s (1.578s including waiting)
  Normal  Created    28s   kubelet            Created container nginx
  Normal  Started    28s   kubelet            Started container nginx
Some really useful information is:
-
name: name of the pod
-
namespace: the namespace it belongs to (automatically assigned to default).
-
Start time: the start time of the pod.
-
Status: the status of the pod (running, stopped, etc.)
-
IP: the IP address which was assigned to this specific pod. Note that this is an internal IP address! You will not be able to connect to it from outside! In order to be able to connect to pods, you have to create services in kubernetes. We'll see that a bit later. Containers & Container ID: Containers hold a list of all docker containers which are running inside of our pod. An item on that list would have a container ID, which is the container ID that was generated/given to it.
-
Controlled By: this field is related to a subject called deployment - where many identical pods are considered as one collection, and so with this field we could see who controls all those identical pods. This fields basically says: "I belong to this deployment". The value here looks something like:
ReplicaSet/DEPLOYMENT_NAME-<replicaSet-hash> -
Image: which image was utilized for this particular container. That's the image which was specified using the --image flag upon creation of the pod.
-
Events: in the events section you can see a message saying the pod was successfully assigned to minikube node, a message about the image which was pulled, creation of the container, and starting of tat container.
There were actually two containers being ran! If you connect to your minikube again with:
minikube ssh
and in there run the command:
docker ps | grep nginx
You'll see two running containers:
ddfde nginx "/docker-entrypoint.…" 37 min ago Up 37 min k8s_nginx_nginx_default_0b6bb6
60a2b k8s.gcr.io/pause:3.6 "/pause" 38 min ago Up 38 min k8s_POD_nginx_default_0b6bb695
Both are related to nginx.
First one is named: k8s_nginx_nginx...
And the second one is named: k8s_POD_nginx...
The second one is also known as "pause container".
You can actually see, that the first one ran the script "/docker-entrypoint", and that the second one launched a script named "/pause".
The point to take from here is that if docker is chosen as the container runtime in kubernetes, there are always such "pause containers" that are created for each specific pod. Those pause containers are created in order to, let's say, lock the namespace of a specific pod. If you recall, we previously discussed how all containers inside of the same pod actually share the same namespace.
So what's basically happening here?
The first container of nginx, it could be stopped, could be recreated by kubernetes, but the pod remains untouched. And this second container, which is called "pause container", is required to lock/keep the namespace of the pod.
• Step 8: connect to a specific container
Alright, let's now see how we can connect to an internal container running inside of our minikube pod. In our case, let's connect to the container running our nginx server. In order to connect to a container, you could use either the id of the image, or the name of the image. You can get the id same as we did above:
docker ps
Grab the id, and then do:
docker exec -it <image-id> sh
Note that this is a docker command (and you should recognize it).
You notice that you're inside the container when the terminal suddenly appears as such:
> _
Inside the bash you can run several useful commands, such as:
hostname
and get back as a response:
nginx
which is actually the name of the pod.
And you can even get the IP address of this container:
hostname -i
And get back as a response:
172.17.0.3
Now let's try to send a request to the server which is running inside of this container where we are currently in, by using curl and the above ip address:
curl 172.17.0.3
This should spit out the famous "Welcome to nginx!" html which is being returned when you hit the nginx gateway. This is simply to say that nginx is up and running. Now, by typing the command:
exit
You get out of the nginx container, but you're are still inside the pod running that container. Let's exit from this connection as well:
exit
Now let's run the command:
Kubectl get pod -o wide
You should get back the response:
NAME READY STATUS RESTARTS AGE IP NODE NOMINATED NODE READINESS GATES
nginx 1/1 Running 0 62m 172.17.0.3 minikube <none> <none>
With that command you can also get back the IP address of a particular pod. Here we can see the same IP address we saw earlier inside the container. If there are several containers inside the pod, they will all share that same IP address.
Alright! So we've just created our first pod in our kubernetes cluster, and we also explored getting some details about that pod.
Before moving forward, let's first delete the pod we created earlier. To delete a pod, use this command:
kubectl delete pod POD_NAME
So in our case:
kubectl delete pod nginx
You should get back the following response saying:
pod nginx deleted
After that the pod will be gone! All volumes, all namespaces related to this particular pod will be removed.
• Step 9: create a deployment
We've talked about how creating pods using the kubectl run command is not very practical, and that you should always aim to create deployments. A deployment will be responsible for the creation of the pods. All pods inside a deployment are exactly the same! A deployment is meant for creating multiple copies of the same pod to distribute load across different nodes within the kubernetes cluster. That's the whole purpose of the deployment.
Now let's go ahead and create a deployment, with the same image we used before - nginx.
We will begin by giving only one copy at first, to sort of replay what we did earlier with the kubectl run command, and after that we'll examine a deployment with multiple copies, and also we'll create a service for this deployment, in order to be able to connect to our deployment from the outside world. Let's go ahead and create a deployment.
To create a deployment, run the following command:
kubectl create deployment DEPLOYMENT_NAME --image=IMAGE_NAME
Let's create an example deployment called:
kubectl create deployment nginx-deployment --image=nginx
The response should appear as:
deployment.apps/nginx-deployment created
Next, let's get all deployments with the command:
kubectl get deployments
The response we'd get back is:
NAME                READY   UP-TO-DATE  AVAILABLE   AGE
nginx-deployment    1/1   1             1           2m35s
Here we see our single deployment, which is ready and up-to-date.
Now let's run the command "get pods":
kubectl get pods
The response back should be something like this:
NAME READY STATUS RESTARTS AGE
nginx 1/1 Running 1 (6m29s ago) 24h
nginx-deployment-85c6 1/1 Running 0 5m3s
We see that there is now a single pod, which is managed by this particular deployment. The pod was created automatically, as a result of us creating the deployment. Right now we only have the 1 pod in our deployment, but we now have the option to scale, and increase the quantity of the pods.
Before we do that, let's first read some details about the deployment:
kubectl describe deployment DEPLOYMENT_NAME
So in our case, it's:
kubectl describe deployment nginx-deployment
And we should get back a response like this:
Name: nginx-deployment
Namespace: default
CreationTimestamp: Thu, 15 Sep 2022 23:33:18 +0300
Labels: app=nginx-deployment
Annotations: deployment.kubernetes.io/revision: 1
Selector: app=nginx-deployment
Replicas: 1 desired | 1 updated | 1 total | 1 available | 0 unavailable
StrategyType: RollingUpdate
MinReadySeconds: 0
RollingUpdateStrategy: 25% max unavailable, 25% max surge
Pod Template:
Labels: app=nginx-deployment
Containers:
nginx:
Image: nginx
Port: <none>
Host Port: <none>
Environment: <none>
Mounts: <none>
Volumes: <none>
Conditions:
Type Status Reason

---

Available True MinimumReplicasAvailable
Progressing True NewReplicaSetAvailable
OldReplicaSets: <none>
NewReplicaSet: nginx-deployment-85c6d5f6dd (1/1 replicas created)
Events:
Type Reason Age From Message

---

Normal ScalingReplicaSet 11m deployment-controller Scaled up replica set nginx-deployment-85c6d5f6dd to 1
If you scroll up, you could see above the following information:
-
Name of the deployment: A name which was given by the developer. The namespace where such deployment was created. In our case - default namespace.
-
Label: Notice that kubernetes automatically assigned labels to this particular deployment, and there's just a single label: app=nginx-deployment
-
Annotations: Created automatically.
-
Selectors: Selectors are used in order to connect pods with deployment, because in kubernetes, pod & deployment are actually separate objects, and we have to know how to assign specific pods to particular deployments. Here, in our case, we see a
-
selector: app=nginx-deployment. For this particular pod, which was automatically created and assigned to this deployment, we will find a label with the same value of "app=nginx-deployment".
-
Replicas: here you could find information about the number of the pods which are desired by this deployment, and number of pods which are currently running. In our case we only have a single pod, i.e. a single replica, which is desired, 1 updated, 1 in total, and 1 available. It means that now there is 1 pod which is assigned to this deployment.
-
StrategyType: Here we see the value "RollingUpdate". This field tells how to perform updated of deployments. We will get back to it a bit later in this course.
-
Pod Template: notice the corresponding label here, which is "app=nginx-deployment", the same label that is mentioned in the label field. As I've mentioned, that's how the deployment is connected to the particular pods. Events: events related to this particular deployment. Here in our case, we can see a single event called "ScalingReplicaSet". But what is a Replica Set? A bit above the event field you see a field called "NewReplicaSet".
-
NewReplicaSet: a replica set actually manages all pods related to deployment, and a replica set is a set of replicas of your application, because you could create 5, 10, 100 different pods in the same deployment, and all of them are included in the replica set. In our case we see
nginx-deployment-<some-id>. And that why we see here under events, such replica with a message saying "scaled up to 1", meaning 1 pod. One pod was created in this replica set.
Alright, so that's it for the details about our deployment.
Notice that when we ran the command kubectl get pods we saw the name for the pod inside the deployment. If you look closely at its name, you'll see that it's a string that starts with the name of the replica set, which we just discussed, and then it ends with a hash that's unique to this specific pod. If there were multiple pods in the same deployment, you'll see the same hash prefix for the replica set part, but a different pod hash at the end that states "this is a different pod".
• Step 10: scale a deployment
○ Scale up
Now let's try to scale this deployment, and increase the number of pods living inside our deployment. Currently, it only holds a single pod. let's make it 2, or even 3.
For that we can use the scale command:
kubectl scale deployment DEPLOYMENT_NAME --replicas=#number
let's try this out on our nginx-deployment deployment:
deployment.apps/nginx-deployment scaledWe should get back a message saying:
deployment.apps/nginx-deployment scaled
Alright! Let's check that it worked!
Let's run the get pods command and see what we get:
kubectl get pods
And here's the output:
NAME READY STATUS RESTARTS AGE
nginx 1/1 Running 1 (11h ago) 35h
nginx-deployment-85c6d5f6dd-j4ld4 0/1 Creating 0 95s
nginx-deployment-85c6d5f6dd-nvfqx 0/1 Creating 0 95s
nginx-deployment-85c6d5f6dd-qmxj7 0/1 Creating 0 95s
nginx-deployment-85c6d5f6dd-rvz4k 1/1 Running 0 11h
nginx-deployment-85c6d5f6dd-xtwvw 0/1 Creating 0 95s
From the output above we gather that there are 4 new containers, which are currently being created. If we wait long enough and ran the command again, we're bound to see:
NAME READY STATUS RESTARTS AGE
nginx 1/1 Running 1 (11h ago) 35h
nginx-deployment-85c6d5f6dd-j4ld4 1/1 Running 0 95s
nginx-deployment-85c6d5f6dd-nvfqx 1/1 Running 0 95s
nginx-deployment-85c6d5f6dd-qmxj7 1/1 Running 0 95s
nginx-deployment-85c6d5f6dd-rvz4k 1/1 Running 0 11h
nginx-deployment-85c6d5f6dd-xtwvw 1/1 Running 0 95s
We just scaled our deployment to 5 different replicas. That are 5 different pods running right now inside of our kubernetes cluster. Notice how easy it is? We did not create those pod manually, kubernetes scaled this deployment automatically for us. Also notice how all those new pods have the same prefix, which is the name of the replicaSet, and how each pod has its own hash at the end.
I want to print it in another way now, one that shows the IP address of each pod. Remember we saw a command that does this? It's the same get pods command, only with the -o wide addition:
kubectl get pods -o wide
NAME READY STATUS AGE IP NODE NOMINATED NODE READINESS
nginx 1/1 Running 36h 172.17.0.3 minikube <none> <none>
nginx-deployment-85c6d5f6dd-j4ld4 1/1 Running 11m 172.17.0.8 minikube <none> <none>
nginx-deployment-85c6d5f6dd-nvfqx 1/1 Running 11m 172.17.0.6 minikube <none> <none>
nginx-deployment-85c6d5f6dd-qmxj7 1/1 Running 11m 172.17.0.5 minikube <none> <none>
nginx-deployment-85c6d5f6dd-rvz4k 1/1 Running 11h 172.17.0.4 minikube <none> <none>
nginx-deployment-85c6d5f6dd-xtwvw 1/1 Running 11m 172.17.0.7 minikube <none> <none>
And this lets us see how each pod has a different IP address.
○ Scale Down
We just saw how we can scale up from 1 pod to 2+ pods, but it was all actually a part of the kubernetes scaling up mechanism. When you're scaling up with kubectl, you are creating more pods, meaning more pods would be added, and go through a CreatingContainer stage. However, if you scale down, from let's say 5 to 2, then 3 pods would simply be removed, and you'd be left with 2 out of the 5 pods in a running state. No new pods need to be created! How cool is that?! And of course - efficient.